Using HPE Ezmeral Data Fabric File Store Container Storage Provider Part 1
Installing PE Ezmeral Data Fabric File Store on AWS our infrastructure with Terraform and kubeadm
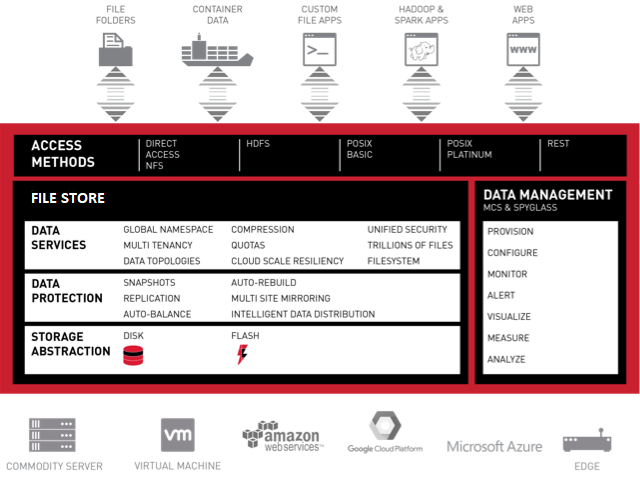
What is HPE Ezmeral Data Fabric File Store ?
HPE Ezmeral Data Fabric, part of the HPE Ezmeral software portfolio, uses innovative technology originally developed as the MapR Data Platform (MapR Technologies was acquired by HPE in 2019). As a unifying software technology, the HPE Ezmeral Data Fabric delivers highly scalable data storage, access, management and movement across your enterprise, from the edge to the cloud, all within the same security system and with superb reliability. HPE Ezmeral Data Fabric File Store is a distributed filesystem for data storage, data management, and data protection. File Store supports mounting and cluster access via NFS and FUSE-based POSIX clients (basic, platinum, or PACC) and also supports access and management via HDFS APIs. You can manage your clusters from the Managed Control System (web console) and monitor them using HPE Ezmeral Data Fabric Monitoring.
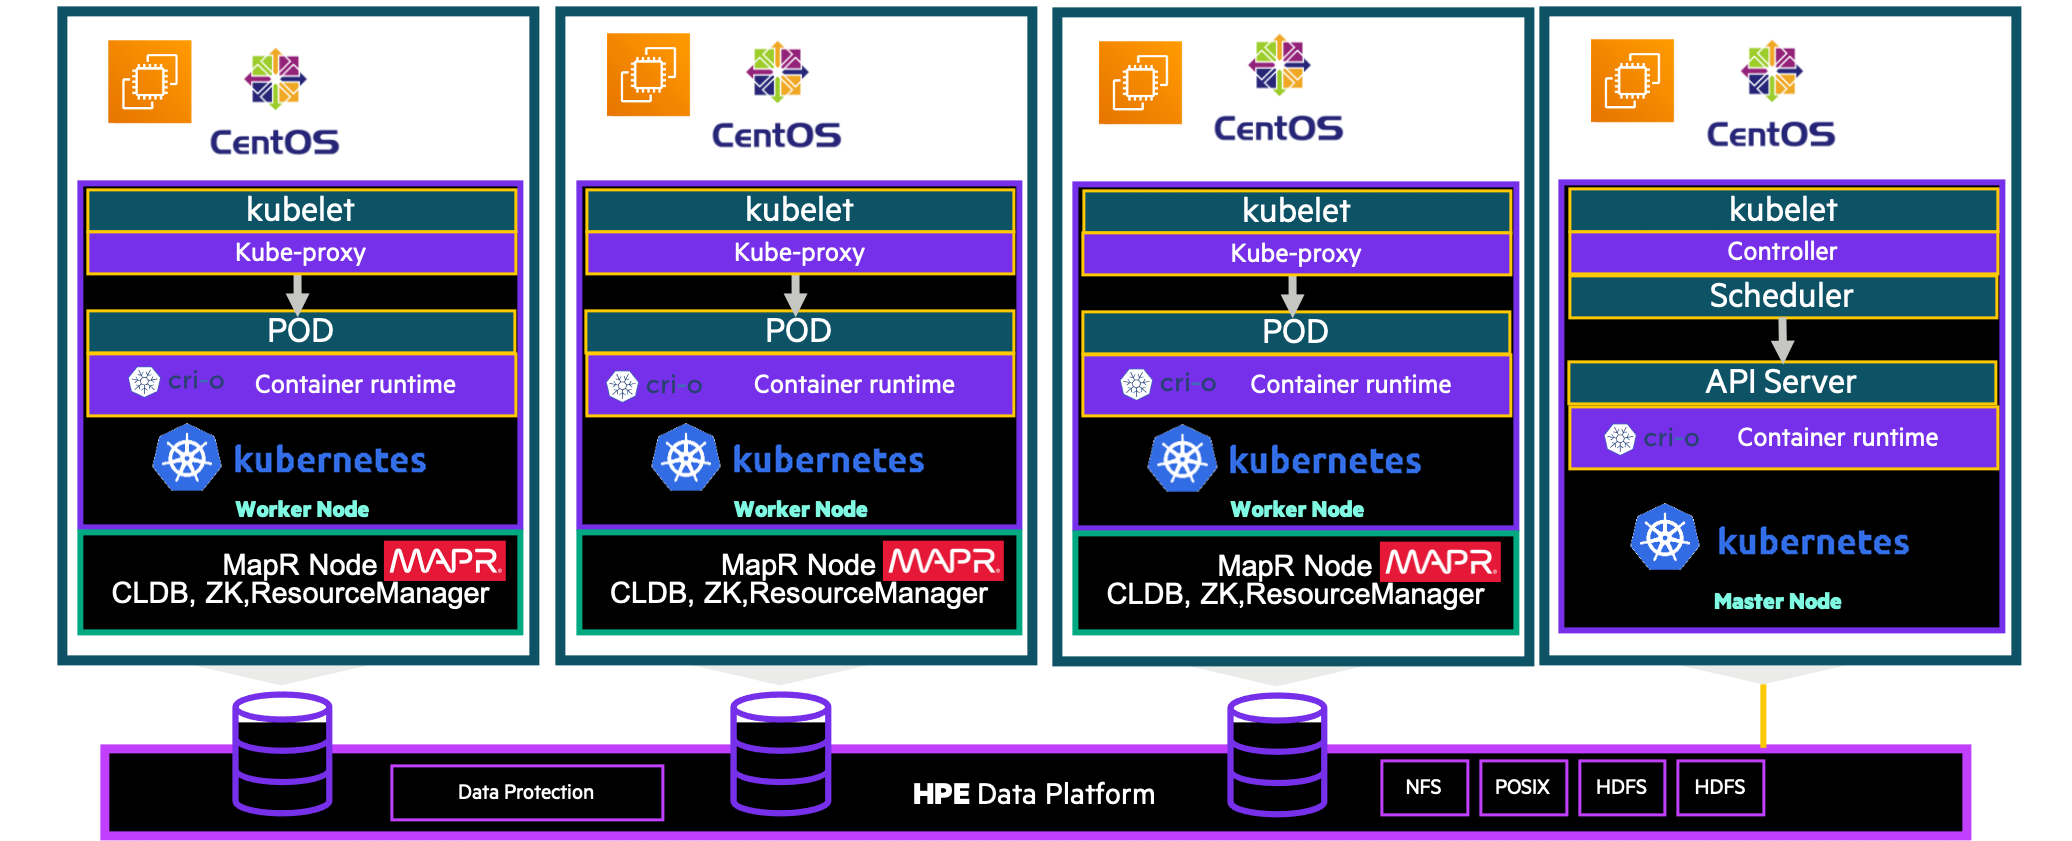
In this blog you will learn to create a kubernetes cluster 4 nodes (1 master and 3 workers) on AWS, it includes 2 steps: (I could have done this deployment in one step but I found it more appropriate to do it in two steps for the understanding)
- Deployment of centos 8.3 instances : (minimum 4 vCPU - 16 GB - 3 disks)
- creation of a DNS domain : datafabric02.local (defined in the variables.tf file)
- register nodes in the domain
- Deployment of HPE Ezmeral Data Fabric 6.2.x
- Terraform establishes a .tfstate file. This file allows Terraform to easily retrieve the current state of the infrastructure and update it to launch other operations on it.
Architecture
We have 4 VMs :
- master01
- k8sworker0
- k8sworker1
- k8sworker2
Prerequisites
Before you get started, you’ll need to have these things:
- Terraform > 0.13.x
- kubectl installed on the compute that hosts terraform
- An AWS account with the IAM permissions
- AWS CLI : the AWS CLI Documentation
- GO language
Initial setup
Clone the repository and install the dependencies:
$ git clone https://github.com/colussim/terraform-mapr-aws.git
$ cd terraform-mapr-aws
The source directory contains two GO programs (PutReverseIP.go and ReverseIP.go) that are used by the Terraform master and worker deployment scripts to generate the reverse ip addresses and the nodehost.json **file (in directory **k8sdeploy-scripts). You may need to recompile them , so you will need GO. After the compilation it will be necessary to copy the binary in the directory: k8sdeploy-scripts
We will immediately create a dedicated ssh key pair to connect to our AWS EC2 instances.
$ mkdir ssh-keys
$ ssh-keygen -t rsa -f id_rsa_aws
$ ssh-keygen -t rsa -f id_rsa_aws
We now have two files id_rsa_aws and id_rsa_aws.pub in our ssh-keys directory.
Step1 : Let’s deploy our infrastructure
This step is not necessary if you already have a 4-nodes kubernetes infrastructure.If this is the case go to step 2
Use terraform init command in terminal to initialize terraform and download the configuration files.
$ terraform initUse terraform apply command in terminal to create Kubernetes cluster with one master and three nodes:
$ terraform applyAfter a few minutes your kubernetes cluster is up 😀
Step2 : Deployment of HPE Ezmeral Data Fabric 6.2.x
For the deployment we will use the Stanzas installer. Installer Stanzas enable API-driven installation for the industry’s only converged data platform. With this capability, operators can build a Stanza that contains layout and settings for the cluster to be installed and passes it programmatically to the installer to execute the set of instructions.
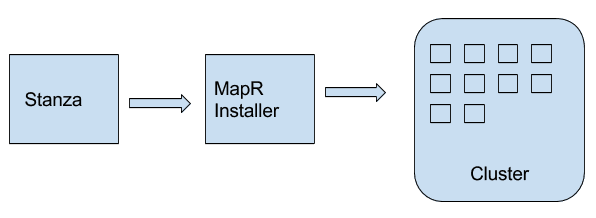
The deployment configuration file is in the Stanzas directory : cluster-install.yaml We deploy the enterprise version which is trial for 30 days, because it allows more functionality than the free community version like snap, clone …
you will need to edit this file to change the following entries to your values :
- cluster_name: your cluster name
- ssh_password: your root passwd on installer node
- mapr_external: host_name:ip_public All host in your cluster*
- mapr_subnet: your intenal ip subnet
- cluster_admin_password: your password for mapr users
- you can also change the names of the disks if necessary….
- if you want to install the community version replace the value M5 by M3 for the license_type input
environment:
  mapr_core_version: 6.2.0
config:
  cluster_admin_create: true
  cluster_admin_gid: 5000
  cluster_admin_group: mapr
  cluster_admin_id: mapr
  cluster_admin_uid: 5000
  cluster_name: mapr02-datafabric.local
  hosts:
    - k8sworker0
    - k8sworker1
    - k8sworker2
  disk_stripe: 3
  disks:
    - /dev/xvdh
    - /dev/xvdi
  ssh_id: root
  ssh_password: xxxxx
  license_type: M5
  mep_version: 8.0.0
  mapr_external: k8sworker0:x.x.x.x,k8sworker1:x.x.x.x,k8sworker2:x.x.x.x
  mapr_id: '103754'
  mapr_name: your email address to register for the license
  mapr_subnet: 10.1.0.0/16
  security: true
  cluster_admin_password: "mapr"
This deployment requires a root connection.It will authorize root access on your nodes (you will be able to forbid it later). you will have to modify the variables.tf file in the mapr directory with your values.
variable "private_key" {
  type        = string
  default     = "../ssh-keys/id_rsa_aws"
  description = "The path to your private key"
}

variable "master_ip" {
  default = "x.x.x.x"
  description = "The IP address for master node"
}

variable "rootpw" {
  default = "xxxx"
  description = "Root passwd"
}

variable "useraws" {
  default = "centos"
  description = "Default user dor Centos Image"
}

variable "maprhost" {
    type = list
    default = ["x.x.x.x", "x.x.x.x", "x.x.x.x", "x.x.x.x"]
    description = "IP public for maprcluster node"
}
Let’s deploy our HPE Ezmeral Data Fabric Cluster :
$ cd mapr
$ terraform init
$ terraform apply
After a few minutes your HPE Ezmeral Data Fabric Cluster is up 😀
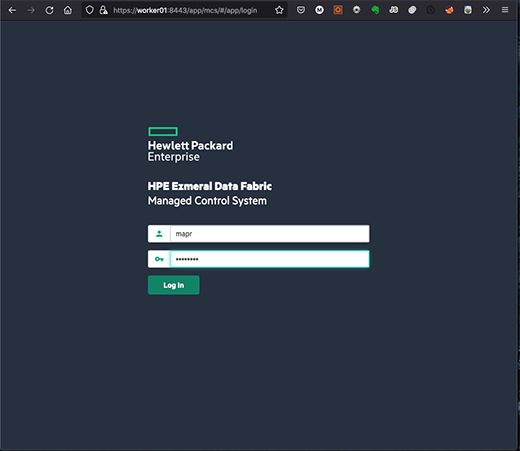
You can now connect to the web management interface of your cluster : https://workernode1:8443 with the user mapr (the password is mapr)
 .
.
You have access to a complete dashboard:
It’s up to you to navigate and discover the features of HPE Ezmeral Data Fabric 😀
 .
.
To activate the Enterprise license (to have the snap functionality) you need to create an account on mapr and register your cluster and then copy the license. You must connect on the following link: https://mapr.com/user/
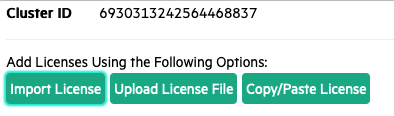
You must retrieve the id of your cluster.In the dashboard in the menu :
Admin/Cluster Settings/Licenses
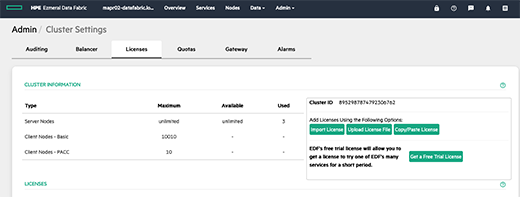
Then connect (or create an account) on https://mapr.com/user/ and add your cluster.A license will be generated, and it will have to be imported.
Go to the Admin/Cluster Settings/Licenses menu and choose the option that suits you:
Next Step
It’s up to you ! Browse the HPE Ezmeral Data Fabric features through the web management interface.
You can also try using workloads on your kubernetes cluster.
To continue on our kubernetes cluster we will:
- install the CSI drivers for HPE Ezmeral Data Fabric
- create a storage class
- create a PVC
install the CSI drivers for HPE Ezmeral Data Fabric
Connect to one of the nodes of your kubernetes cluster (ksworker0 node for example) and and run this command :
$ kubectl create -f https://raw.githubusercontent.com/mapr/mapr-csi/master/deploy/kubernetes/fuse/csi-maprkdf-v1.2.5.yamlCheck that the driver is well installed you should have 4 pods working :
$ kubectl get pods -n mapr-csi -o wide
NAME                       READY   STATUS    RESTARTS   AGE   IP           NODE                            NOMINATED NODE   READINESS GATES
csi-controller-kdf-0       7/7     Running   0          3m   10.44.0.1    k8sworker0.datafabric02.local
csi-nodeplugin-kdf-4xsps   3/3     Running   0          3m   10.1.0.239   k8sworker1.datafabric02.local
csi-nodeplugin-kdf-q5hrn   3/3     Running   0          3m   10.1.1.158   k8sworker0.datafabric02.local
csi-nodeplugin-kdf-rdvgk   3/3     Running   0          3m   10.1.0.56    k8sworker2.datafabric02.local
For dynamic provisioning, you must use a Secret to pass the user name and password of a data-fabric user to the provisioner. This user must have privileges to create and delete a data-fabric volume. The credentials allow the provisioner to make REST calls to the data-fabric webserver. Secrets are protected by the Kubernetes RBAC.
let’s create a namespace :
$ kubectl create ns mapr-studentThe first step is to create Rest secret for dynamic volume provisioning with your platform details.
Kubernetes Secrets enable you to inject sensitive data into a pod.
Replace the password string ‘YWRtaW4=’ with a base64 encoded version of mapr user password .
secure_rest_ticket.yaml file :
apiVersion: v1
kind: Secret
metadata:
  name: mapr-provisioner-secrets
  namespace: mapr-student
type: Opaque
data:
  MAPR_CLUSTER_USER: bWFwcg==
  MAPR_CLUSTER_PASSWORD: QmVuY2gxMjM=
$ kubectl create -f mapr-provisioner-secretsThe second step is to create a secret for MapR ticket with your platform details.
For static and dynamic provisioning, you must specify a Secret, which is the base64 representation of the ticket, to enable the POSIX client to communicate with a secure MapR cluster. The ticket for the POSIX client can be generated on the MapR cluster using the maprlogin utility.
The steps to generate the ticket or retrieve the value of the existing ticket are as follows :
- Logon MapR Cluster, and locate the ticket file using "maprlogin print" or generate a new ticket file using "maprlogin password" :
For example, here we are using "mapr" user ticket file located at /tmp/maprticket_5000. - Convert the ticket into base64 representation and save the output :
** cat /tmp/maprticket_5000 | base64** - Assign the value of the converted ticket to **CONTAINER_TICKET**
Locate the ticket file using “maprlogin print” or generate a new ticket file using “maprlogin password”.For example, here we are using “mapr” user’s ticket file located at /tmp/maprticket_5000.
$ su – mapr
$ maprlogin password
[Password for user 'mapr' at cluster 'mapr-epc': ]
MapR credentials of user 'mapr' for cluster 'mapr-epc' are written to '/tmp/maprticket_5000’
$
Convert the ticket into base64 representation and save the output.
$ cat /tmp/maprticket_5000 | base64 > ticket_b64.txtCreate a YAML file named secure_ticket-secret.yaml ,CONTAINER_TICKET : is the content of the **ticket_b64.txt **file.
secure_ticket.yaml :
apiVersion: v1
kind: Secret
metadata:
  name: mapr-ticket-secret
  namespace: mapr-student
type: Opaque
data:
  CONTAINER_TICKET: bWFwcjAyLWRhdGFmYWJyaWMubG9jYWwgVG1hM2FkMzd5R05sVzRBbEJUVVRUMmwrM1ZPS096bTdRSDNNRkJDbGd5NkFTcDFqczNaY3hUM2dEQ1krOU1XQ0ZSbVhFa09tb01LN1ROK3Zuc05zWnZGMUdvNFZVcnp6c2ptTkpGM2s5STMzSWgwWnhOTFhSbzMvZmFOY3JQZjEyOHRKV245amJrZjZIUWZKVktaM3g5U3hzSTBoYi9NWmRVa3BEMys
$ kubectl create -f secure_ticket.yaml -n mapr-studentWe can now create our storage class
Create a storage class
create_storageclass.yaml file :
The cldbHosts entry corresponds to the internal ip address of your MAPR cluster, you should probably modify them in this file. The restServers entry corresponds to the internal ip address of the server that hosts the web management interface
apiVersion: storage.k8s.io/v1
kind: StorageClass
metadata:
  name: mapr-student-sc
  namespace: mapr-stundent
provisioner: com.mapr.csi-kdf
allowVolumeExpansion: true
parameters:
    csi.storage.k8s.io/provisioner-secret-name : mapr-provisioner-secrets
    csi.storage.k8s.io/provisioner-secret-namespace : mapr-student
    csi.storage.k8s.io/controller-expand-secret-name: mapr-provisioner-secrets
    csi.storage.k8s.io/controller-expand-secret-namespace: mapr-student
    csiNodePublishSecretName: "mapr-ticket-secret"
    csiNodePublishSecretNamespace: "mapr-student"
    restServers: "10.1.0.239:8443"
    cldbHosts: "10.1.0.239:7222 10.1.1.158:7222 10.1.0.56:7222"
    cluster: mapr02-datafabric.local
    securityType: secure # Default: unsecure
    namePrefix: PVC-mssql
    mountPrefix: /mssql
    replication: "3"
    minreplication: "2"
    nsreplication: "3"
    nsminreplication: "2"
    type: "rw"
    mount: "1"
we will create a storage class called : mapr-student-sc
$ kubectl create -f create_storageclass.yaml We can now create our PVC
Create a PVC
We will create a PVC of about 50Gb which is named mapr-sqlserver-data01 and which uses the storage class mapr-student-sc
create_pvc.yaml file :
apiVersion: v1
kind: PersistentVolumeClaim
apiVersion: v1
metadata:
  name: mapr-sqlserver-data01
  namespace: mapr-student
spec:
  storageClassName: mapr-student-sc
  accessModes:
    - ReadWriteOnce
  resources:
    requests:
      storage: 50G
$ kubectl create -f create_pvc.yamlCheck a PVC is created :
$ get pvc -n mapr-student
NAME STATUS VOLUME CAPACITY ACCESS MODES STORAGECLASS AGE
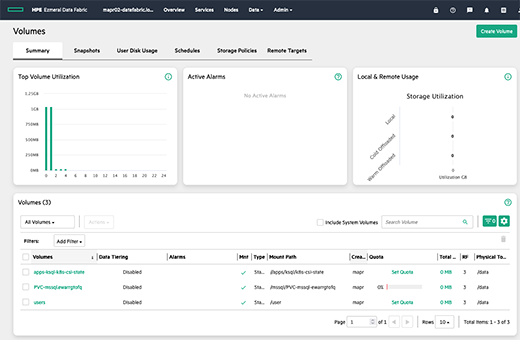
mapr-sqlserver-data01 Bound mapr-pv-8a5dfc69-9e89-4ebe-a008-fdb95830c25f 49Gi RWO mapr-student-sc 14s You can connect to the MapR management web interface and see the volume created :
Next
Now you just have to deploy a workload on this PVC and test the snap and clone functions of the CSI drivers, Enjoy !! 😀
All used files are in the mapr-csi directory
Conclusion
With kubeadm and Terraform, booting a Kubernetes cluster can be done with a single command and it only takes four minutes to get a fully functional configuration.
As you can see, it is quite easy to deploy a HPE Ezmeral Data Fabric File Store with Terraform and set up and use HPE Ezmeral Data Fabric CSI Driver .
Next step : deploy an application in our cluster .
Resources :
HPE Ezmeral Data Fabric download
HPE Ezmeral Data Fabric CSI Storage Plugin
HPE Ezmeral Data Fabric CSI documentation