CSI driver implementation for OpenEBS CStor storage engine.
Container Storage Interface (CSI) is an initiative to unify the storage interface of Container Orchestrator Systems (COs) like Kubernetes, Mesos, Docker swarm, cloud foundry, etc…
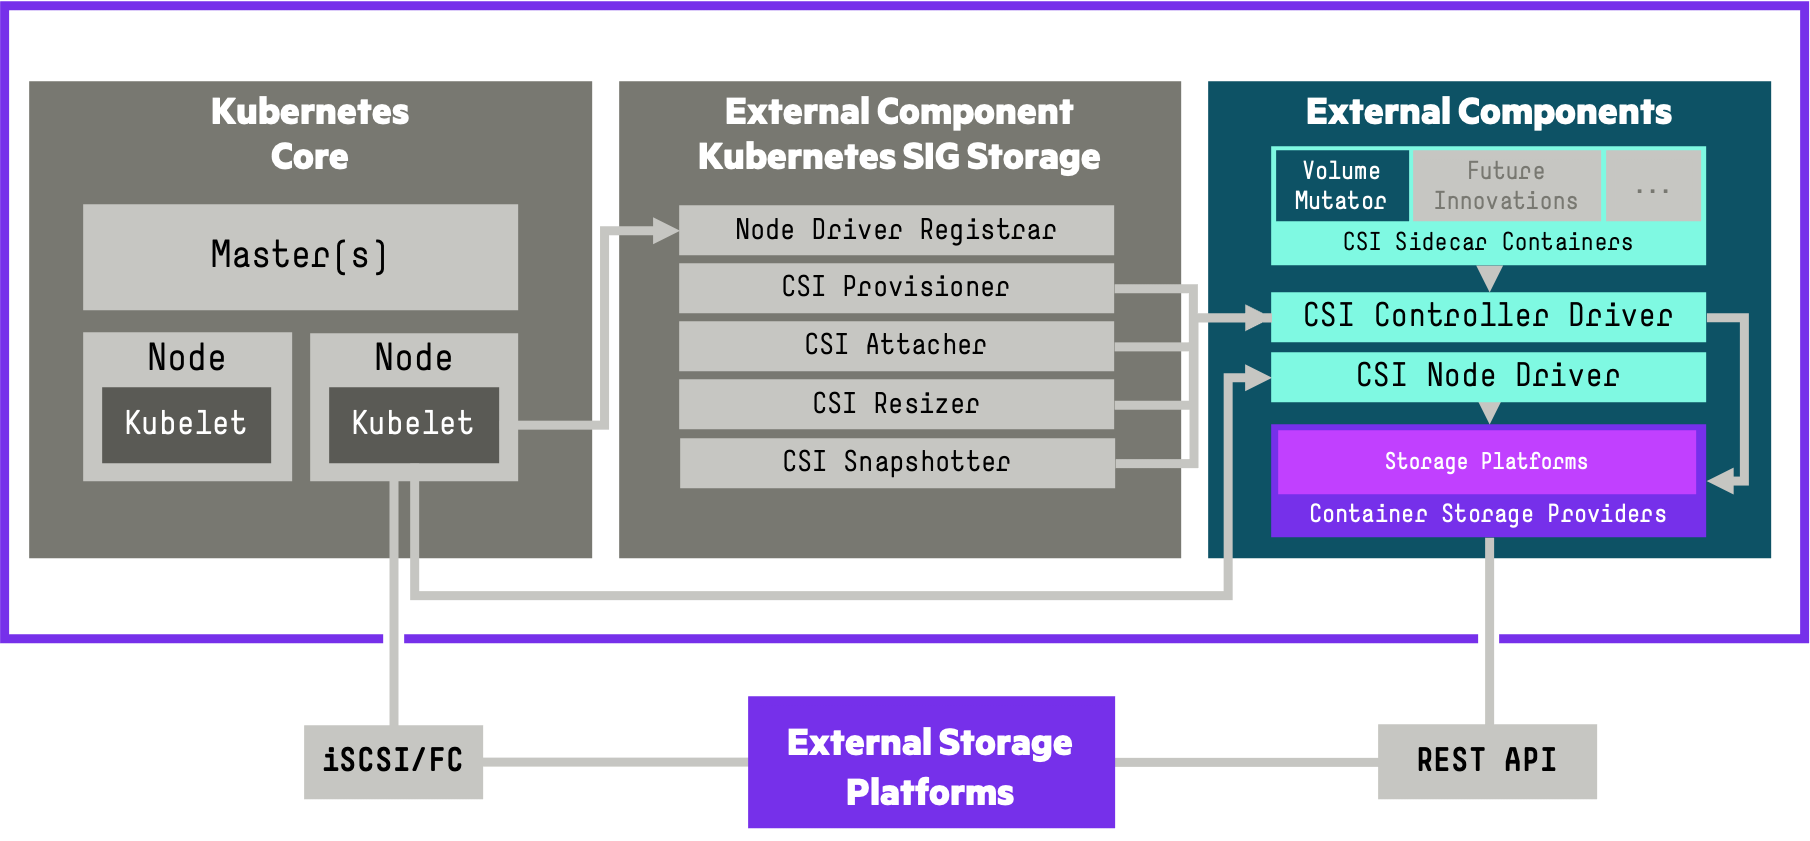
The OpenEBS CStor CSI Driver for Kubernetes allows you to use a Container Storage Provider to perform data management operations on storage resources.Currently OpenEBS CStor CSI Driver is in Beta
The current implementation supports the following for CStor Volumes:
- Provisioning and De-provisioning with ext4,xfs filesystems
- Snapshots and clones
- Volume Expansion
- Volume Metrics
In this post you will see :
- How to deploy OpenEBS CSI Driver
- Creating a Storage Class
- Provisioning a Persistent Volume Claim
- Deploying a SQL Server instance on an OpenEBS storage
- Expand volume
Prerequisites
Before you get started, you’ll need to have these things:
- Kubernetes 1.17+ with RBAC enabled
- You will need to have OpenEBS Version 1.12 or higher installed
- iSCSI PV support in the underlying infrastructure
- CStor CSI driver operates on the cStor Pools provisioned using the new schema called CSPC
- Storage disk available in each workers nodes
Infra
Initial setup
You must first provision a CStorPoolCluster if you have not done so before. For our example we will provision a stripe pool on two nodes.A minimum of 3 replicas (on 3 nodes) is recommended for high-availability.
We will use the following yaml file: epc-cspc-stripe.yaml
and modify by performing follwing steps:
Modify CSPC to add your node selector for the node where you want to provision the pool. List the nodes with labels:
$ kubectl get node
NAME        STATUS   ROLES                  AGE   VERSION
bandol      Ready    control-plane,master   20d   v1.21.0
cabernet    Ready    worker                 20d   v1.21.0
sauvignon   Ready    worker                 20d   v1.21.0
In this exemple cabernet is picked. Modify the CSPC yaml to use this worker. (Note: Use the value from labels kubernetes.io/hostname=worker1 as this label value and node name could be different in some platforms)
kubernetes.io/hostname: "cabernet"Modify CSPC to add blockdevice attached to the same node where you want to provision the pool.
$ kubectl get blockdevice -o wide -n epc-openebs
NAME                                           NODENAME   PATH         FSTYPE         SIZE            CLAIMSTATE   STATUS     AGE
blockdevice-a565e70b8c1248f9ecfb50bb918bd304   cabernet   /dev/dm-14                  161061273600    Unclaimed    Active     11h
blockdevice-804794f18d1d3e51663d181a2d1169e5   sauvignon  /dev/dm-16                  161061273600    Unclaimed    Inactive   11h
$
blockDeviceName: "blockdevice-a565e70b8c1248f9ecfb50bb918bd304"Finally the CSPC YAML looks like the following :
apiVersion: cstor.openebs.io/v1
kind: CStorPoolCluster
metadata:
  name: cspc-student1
  namespace: epc-openebs
spec:
  pools:
  - nodeSelector:
      kubernetes.io/hostname: "cabernet"
    dataRaidGroups:
    - blockDevices:
      - blockDeviceName: "blockdevice-a565e70b8c1248f9ecfb50bb918bd304"
    poolConfig:
      defaultRaidGroupType: "stripe"

  - nodeSelector:
      kubernetes.io/hostname: "sauvignon"
    dataRaidGroups:
    - blockDevices:
      - blockDeviceName: "blockdevice-804794f18d1d3e51663d181a2d1169e5"
    poolConfig:
      defaultRaidGroupType: "stripe"
Apply the modified CSPC YAML.
$ kubectl apply -f epc-cspc-stripe.yaml -n epc-openebs
storpoolcluster.cstor.openebs.io/cstor-storage created
$
Check if the pool instances report their status as ‘ONLINE’.
$ kubectl get cspc -n epc-openebs
NAME            HEALTHYINSTANCES   PROVISIONEDINSTANCES   DESIREDINSTANCES   AGE
cstor-storage   1                  1                      2                  2m31s
$
OpenEBS CStor CSI driver comprises of 2 components:
- A controller component launched as a StatefulSet, implementing the CSI controller services. The Control Plane services are responsible for creating/deleting the required OpenEBS Volume.
- A node component that runs as a DaemonSet, implementing the CSI node services. The node component is responsible for performing the iSCSI connection management and connecting to the OpenEBS Volume.
CStor CSI driver
OpenEBS CStor CSI driver components can be installed by running the following command :
$ kubectl apply -f https://raw.githubusercontent.com/openebs/cstor-csi/master/deploy/csi-operator.yaml

customresourcedefinition.apiextensions.k8s.io/cstorvolumeattachments.cstor.openebs.io created
customresourcedefinition.apiextensions.k8s.io/volumesnapshotclasses.snapshot.storage.k8s.io created
customresourcedefinition.apiextensions.k8s.io/volumesnapshotcontents.snapshot.storage.k8s.io created
customresourcedefinition.apiextensions.k8s.io/volumesnapshots.snapshot.storage.k8s.io created
Warning: storage.k8s.io/v1beta1 CSIDriver is deprecated in v1.19+, unavailable in v1.22+; use storage.k8s.io/v1 CSIDriver
csidriver.storage.k8s.io/cstor.csi.openebs.io created
clusterrolebinding.rbac.authorization.k8s.io/openebs-cstor-csi-snapshotter-binding created
clusterrole.rbac.authorization.k8s.io/openebs-cstor-csi-snapshotter-role created
serviceaccount/openebs-cstor-csi-controller-sa created
clusterrole.rbac.authorization.k8s.io/openebs-cstor-csi-provisioner-role created
clusterrolebinding.rbac.authorization.k8s.io/openebs-cstor-csi-provisioner-binding created
statefulset.apps/openebs-cstor-csi-controller created
clusterrole.rbac.authorization.k8s.io/openebs-cstor-csi-attacher-role created
clusterrolebinding.rbac.authorization.k8s.io/openebs-cstor-csi-attacher-binding created
clusterrole.rbac.authorization.k8s.io/openebs-cstor-csi-cluster-registrar-role created
clusterrolebinding.rbac.authorization.k8s.io/openebs-cstor-csi-cluster-registrar-binding created
serviceaccount/openebs-cstor-csi-node-sa created
clusterrole.rbac.authorization.k8s.io/openebs-cstor-csi-registrar-role created
clusterrolebinding.rbac.authorization.k8s.io/openebs-cstor-csi-registrar-binding created
configmap/openebs-cstor-csi-iscsiadm created
daemonset.apps/openebs-cstor-csi-node created
$
Verify that the OpenEBS CSI Components are installed :
$ kubectl get pods -n epc-openebs -l role=openebs-cstor-csi
NAME                             READY   STATUS    RESTARTS   AGE
openebs-cstor-csi-controller-0   6/6     Running   0          104s
openebs-cstor-csi-node-cvkd5     2/2     Running   0          104s
openebs-cstor-csi-node-ngtn9     2/2     Running   0          104s
$
Create a Storage class
Once your pool instances have come online, you can proceed with volume provisioning. Create a storageClass to dynamically provision volumes using OpenEBS CSI provisioner.
kind: StorageClass
apiVersion: storage.k8s.io/v1
metadata:
  name: sc-cstor-csi-student1
provisioner: cstor.csi.openebs.io
allowVolumeExpansion: true
parameters:
  cas-type: cstor
  # cstorPoolCluster should have the name of the CSPC
  cstorPoolCluster: cstor-storage
  # replicaCount should be <= no. of CSPI
  replicaCount: "1"
Create a storageClass using above example.
We will use the following yaml file: storage_class_csi.yaml
$ kubectl create -f storage_class_csi.yaml
storageclass.storage.k8s.io/sc-cstor-csi-student1 created
$
Verify if storageclass : sc-cstor-csi-student1 is created successfully using the following command.
$ kubectl get sc|grep student1

NAME                    PROVISIONER                   RECLAIMPOLICY   VOLUMEBINDINGMODE      ALLOWVOLUMEEXPANSION   AGE
sc-cstor-csi-student1  cstor.csi.openebs.io               Delete          Immediate          true                    8s
$
Create a PVC yaml using above created StorageClass name
kind: PersistentVolumeClaim
apiVersion: v1
metadata:
  name: mssqldata01-cstor-vol-student1
spec:
  storageClassName: sc-cstor-csi-student1
  accessModes:
    - ReadWriteOnce
  resources:
    requests:
      storage: 50Gi
Create a PVC using above example.
We will use the following yaml file: create_pvc_csi.yaml
$ kubectl create -f create_pvc_csi.yaml -n student1
persistentvolumeclaim/mssqldata01-cstor-vol-student1 created
$
Verify if PVC : mssqldata01-cstor-vol-student1 is created successfully using the following command.
$ kubectl get pvc -n student1

NAME                             STATUS   VOLUME                                     CAPACITY   ACCESS MODES   STORAGECLASS      AGE
mssqldata01-cstor-vol-student1   Bound    pvc-28d6ddde-ee8a-4d83-bca2-91e25c8aae50   50Gi       RWO            sc-cstor-csi-student1   9m1s
$
Verify volume and its replicas are in Healthy state.
$ kubectl get cstorvolume -n epc-openebs
NAME                                       CAPACITY   STATUS    AGE
pvc-28d6ddde-ee8a-4d83-bca2-91e25c8aae50   50Gi       Healthy   13m
$
Deployment of a database instance
We will deploy a Microsoft SQL Server instance that uses the PVC we have created. we will use the following deployment file:
apiVersion: v1
kind: Secret
metadata:
  name: csi-sqlsecret-student1
type: Opaque
data:
  sapassword: SFBlaW52ZW50QA==
---
apiVersion: apps/v1
kind: Deployment
metadata:
  name: mssql-deployment
spec:
  replicas: 1
  selector:
    matchLabels:
     app: mssql
  strategy:
    type: Recreate
  template:
    metadata:
      labels:
        app: mssql
    spec:
      terminationGracePeriodSeconds: 10
      securityContext:
          runAsUser: 1003
          fsGroup: 1003
      containers:
      - name: mssql
        image: mcr.microsoft.com/mssql/rhel/server:2019-latest
        ports:
        - containerPort: 1433
        env:
        - name: MSSQL_PID
          value: "Developer"
        - name: ACCEPT_EULA
          value: "Y"
        - name: SA_PASSWORD
          valueFrom:
            secretKeyRef:
              name: csi-sqlsecret-student1
              key: sapassword
        volumeMounts:
        - name: mssqldb
          mountPath: /var/opt/mssql
      volumes:
      - name: mssqldb
        persistentVolumeClaim:
          claimName: mssqldata01-cstor-vol-student1
---
apiVersion: v1
kind: Service
metadata:
  name: mssql-service
spec:
  selector:
    app: mssql
  ports:
    - protocol: TCP
      port: 1433
      targetPort: 1433
  type: NodePort
In this example the password of the MS SQL Server user sa is encrypted in base64 is : HPeinvent@. Deploy MS SQL Server using above example.
We will use the following yaml file: deploy-mssql-s.yaml
$ kubectl create -f deploy-mssql-s.yaml -n student1
secret/csi-sqlsecret-student1 created
deployment.apps/mssql-deployment created
service/mssql-service created
$
Check if your SQL Server instance works:
$ kubectl get pods -n student1

NAME                                READY   STATUS    RESTARTS   AGE
mssql-deployment-595bf94845-kgs2l   1/1     Running   0          35s
$
Volume expansion
One of the most common operations in storage and data management is to expand volume capacity. This feature has been in beta since Kubernetes 1.16 and is now available in the HPE CSI Driver for Kubernetes as a supported feature. In true Kubernetes simplistic fashion the end-user that created the PVC may simply increase the capacity of the PVC specification and the CSI resizer will pick it up and perform all the necessary operations. These operations include increasing the backend storage system volume size, rescanning the multipath device on the host and finally growing the filesystem.This used to be a tedious operation that required a storage admin and Kubernetes admin to satisfy a user requirement, which is very counter-productive.
we will go expand the storage requests for the SQL Server production instance, we will extend the pvc created in the previous step: mssqldata01-cstor-vol-student1
we will then patch the definition of the PVC associate with the command kubectl apply -f patch_file.
Patch file example for PVC mssqldata01-cstor-vol-student1 : patch-csi-pvc.yaml
apiVersion: v1
kind: PersistentVolumeClaim
metadata:
  name: mssqldata01-cstor-vol-student1
spec:
  accessModes:
  - ReadWriteOnce
  resources:
    requests:
      storage: 100Gi
  storageClassName: sc-cstor-csi-student1
We will use the following yaml file: patch-csi-pvc.yaml
Show the size of the volume inside the container
The size of the PVC is about 50Gi : /var/opt/mssql
$ kubectl -n student1 exec -ti mssql-deployment-595bf94845-kgs2l -- /bin/df -h

Filesystem             Size  Used Avail Use% Mounted on
overlay                 50G   24G   27G  47% /
tmpfs                   64M     0   64M   0% /dev
tmpfs                   63G     0   63G   0% /sys/fs/cgroup
/dev/mapper/rhel-root   50G   24G   27G  47% /etc/hosts
shm                     64M     0   64M   0% /dev/shm
**/dev/mapper/mpathch     49G  182M   49G   1% /var/opt/mssql**
tmpfs                   63G   12K   63G   1% /run/secrets/kubernetes.io/serviceaccount
tmpfs                   63G     0   63G   0% /proc/acpi
tmpfs                   63G     0   63G   0% /proc/scsi
tmpfs                   63G     0   63G   0% /sys/firmware

$
Let us apply the patch …
$ kubectl apply -f patch-csi-pvc.yaml -n student1
persistentvolumeclaim/mssqldata01-cstor-vol-student1 configured
$
Show the new size of the updated PVC :
$ kubectl get pvc n student1
NAME                             STATUS   VOLUME                                     CAPACITY   ACCESS MODES   STORAGECLASS            AGE
mssqldata01-cstor-vol-student1   Bound    pvc-395ec2f1-8f93-4c9c-a5a6-f495b195315b   **100Gi**      RWO            sc-cstor-csi-student1   49m
$
Show a new size of the volume inside the container is about 100Gi :: /var/opt/mssql
$ kubectl -n student1 exec -ti mssql-deployment-595bf94845-kgs2l -- /bin/df -h
Filesystem             Size  Used Avail Use% Mounted on
overlay                 50G   24G   27G  47% /
tmpfs                   64M     0   64M   0% /dev
tmpfs                   63G     0   63G   0% /sys/fs/cgroup
/dev/mapper/rhel-root   50G   24G   27G  47% /etc/hosts
shm                     64M     0   64M   0% /dev/shm
/dev/mapper/mpathch     99G  182M   99G   1% /var/opt/mssql
tmpfs                   63G   12K   63G   1% /run/secrets/kubernetes.io/serviceaccount
tmpfs                   63G     0   63G   0% /proc/acpi
tmpfs                   63G     0   63G   0% /proc/scsi
tmpfs                   63G     0   63G   0% /sys/firmware

$
You can use CSI provisioner to create your Snapshot and Clone.I will not detail the procedure in this post please see the post: Using Volume Snapshot and Clone of a cStor Volume in OpenEBS .
Conclusion
As you can see, it’s quite easy to set up and use OpenEBS CSI Driver.
This version include all the latest capabilities in the CSI specification :
- Dynamic Provisionning : Parameter Overloading
- Volume Snapshots
- Data Sources : Cloning - Volume Snapshot and Restore
- Volume Expansion
- Raw Block
Resources :
 Documentation