Our first AWS infrastructure since Terraform
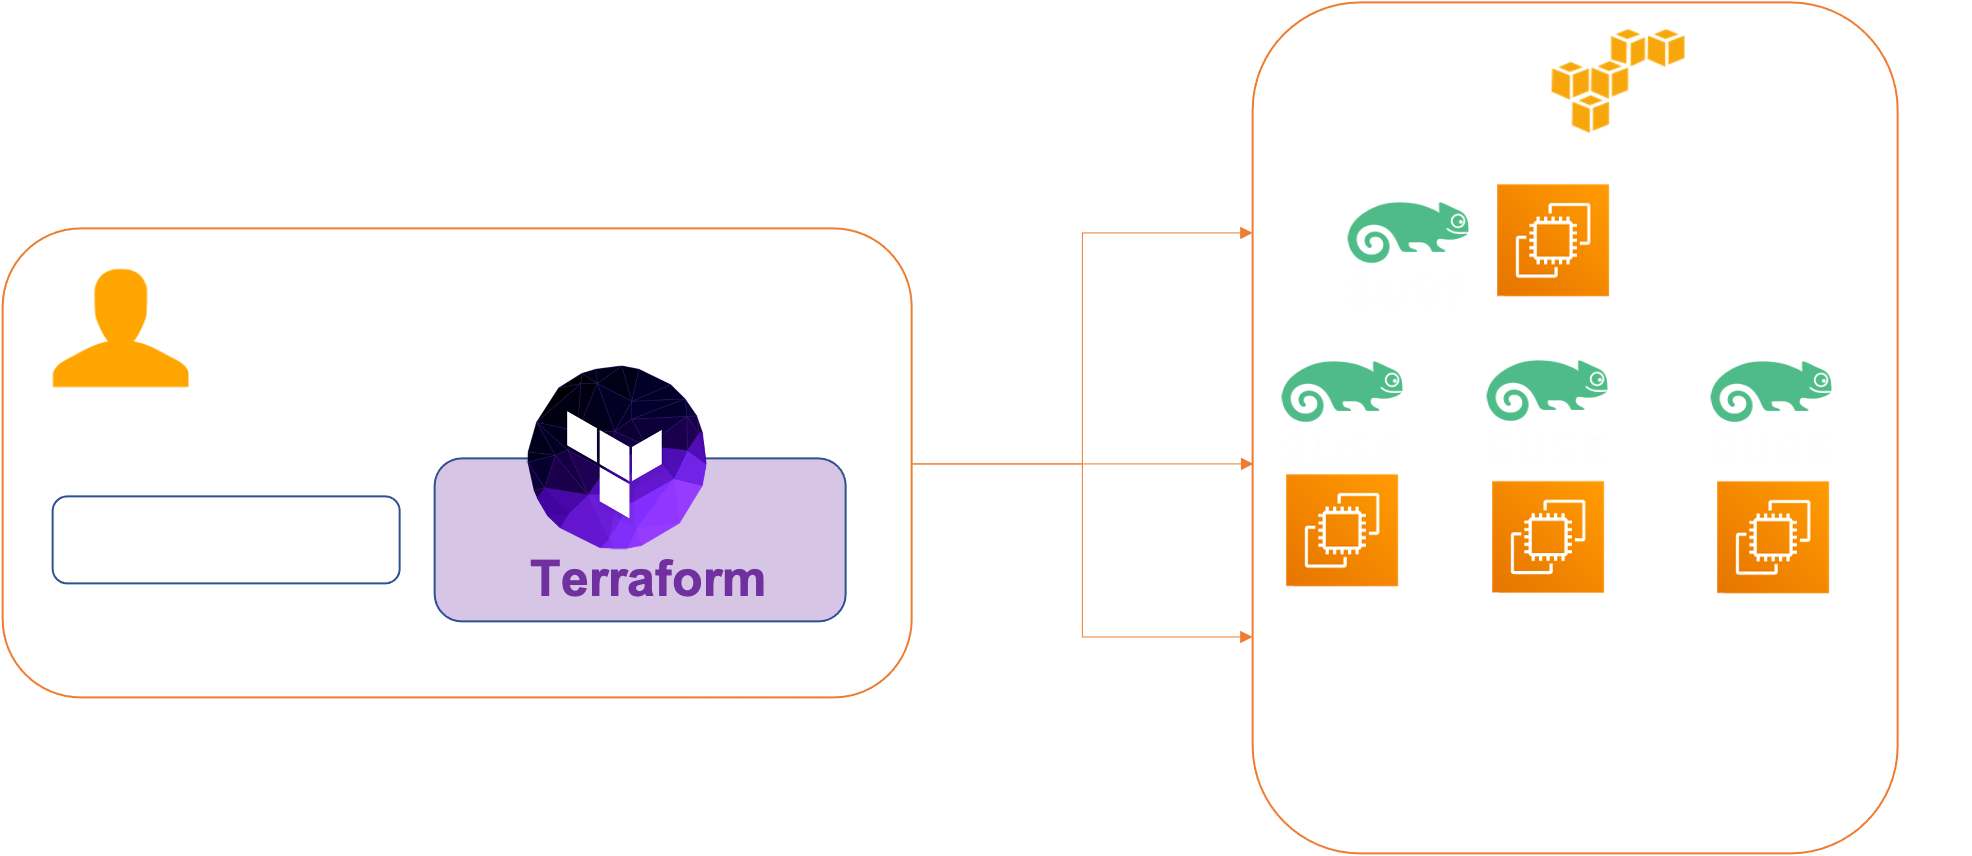
The purpose of this tutorial is to create 4 identical Suse Linux Enterprise 15.2 virtual machines in AWS that we will deploy only with Terraform. With the goal of using this infrastrucutre to deploy a kubernetes cluster .
Architecture
We will create 4 VMs :
- master-node-0
- worker-node-0
- worker-node-1
- worker-node-2

Prerequisites
Before you get started, you’ll need to have these things:
- Terraform > 0.13.x
- kubectl installed on the compute that hosts terraform
- An AWS account with the IAM permissions
- AWS CLI : the AWS CLI Documentation
Initial setup
The first thing to set up is your Terraform. We will create an AWS IAM users for Terraform.
In your AWS console, go to the IAM section and create a user named “Terraform”. Then add your user to a group named “FullAccessGroup”. Attaches to this group the following rights:
AmazonEC2FullAccessAfter these steps, AWS will provide you a Secret Access Key and Access Key ID. Save them preciously because this will be the only time AWS gives it to you.
In your own console, create a ~/.aws/credentials file and put your credentials in it:
[default]
 aws_access_key_id=***********
 aws_secret_access_key=****************************
Clone the repository and install the dependencies:
$ git clone https://github.com/colussim/terraform-aws-infra.git
$ cd terraform-aws-infra
terraform-aws-infra:>$
We will immediately create a dedicated ssh key pair to connect to our AWS EC2 instances.
terraform-aws-infra:>$ mkdir ssh-keys
terraform-aws-infra/ssh-keys:>$ ssh-keygen -t rsa -f id_rsa_aws
terraform-aws-infra:>$ ssh-keygen -t rsa -f id_rsa_aws
We now have two files id_rsa_aws and id_rsa_aws.pub in our ssh-keys directory.
Take a closer look at the Terraform configuration files.
We have a first file main.tf with the following content. This file will contain general information about Terraform and its relationship with AWS:
provider "aws" {
region = "us-east-1"
shared_credentials_file = "~/.aws/credentials"
}
Let’s detail the contents of this file:
- **provider** : this directive defines the provider with which terraform will interact. This is aws.
- **region** : the name of the default region
- **shared_credentials_file** : your own AWS credentials defined in the first step
The file vpc.tf which contains the information of our virtual private cloud (vpc), namely a logical and independent organization of our infrastructure in the AWS cloud.
We will define a VPC and its Subnet and then define the routing table for the VPC
## Define a VPC
variable "region" { default = "us-east-1" }

resource "aws_vpc" "vpc01" {
 cidr_block = "10.1.0.0/16"
 enable_dns_support   = true
  enable_dns_hostnames = true
}

## Define a Subnet
resource "aws_subnet" "vmtest-a" {
 vpc_id = "${aws_vpc.vpc01.id}"
 cidr_block = "10.1.0.0/23"
 availability_zone = "${var.region}a"
 map_public_ip_on_launch = true
}

## Define the routing table for the VPC
resource "aws_internet_gateway" "gw-to-internet01" {
 vpc_id = "${aws_vpc.vpc01.id}"
}

resource "aws_route_table" "route-to-gw01" {
 vpc_id = "${aws_vpc.vpc01.id}"
 route {
 cidr_block = "0.0.0.0/0"
   gateway_id = "${aws_internet_gateway.gw-to-internet01.id}"
 }
}
resource "aws_route_table_association" "vmtest-a" {
 subnet_id = "${aws_subnet.vmtest-a.id}"
 route_table_id = "${aws_route_table.route-to-gw01.id}"
}
In the security.tf file we will define the security rule to allow ssh access only from some specific ips (for security reasons) and allow the vm to access anywhere:
resource "aws_security_group" "sg_infra" {
 name = "sg_infra"
 description = "standard ssh & monitoring"
 vpc_id = "${aws_vpc.vpc01.id}"

 ingress {
   from_port = 22
   to_port = 22
   protocol = "tcp"
   cidr_blocks = ["0.0.0.0/0"]
 }

 ingress {
   from_port = -1
   to_port = -1
   protocol = "icmp"
   cidr_blocks = ["0.0.0.0/0"]
 }
 egress {
      from_port = 0
      to_port = 0
      protocol = "-1"
      cidr_blocks = ["0.0.0.0/0"]
 }
}

- **vpc_id** : defines which vpc this security group belongs to.
- **ingress** : will define the inbound flows to the resources that belong to this security group, in this article our instance.
- **from_port** : for the source port, here 22 to allow SSH.
- **to_port** : for the destination port, here 22 to allow SSH.
- **protocol** : for the protocol type of the stream.
- **cidr_blocks** : indicates a list of accepted input addresses. This is the address of my office.
- **egress** : will define the outgoing flows of the resources attached to our security group.
- **from_port** : for the source port. Here 0 because we will allow everything.
- **to_port** : for the destination port. Here 0 because we will allow everything.
- **protocol** : for the protocol type. Here a special case with a value of -1 because we allow all types of output streams.
- **cidr_blocks** : for the destination addresses. Here 0.0.0.0/0 to allow everything.
In the master_instence.tf and worker_instance files we will define the description of our instances :
master_instance.tf file :
resource "aws_key_pair" "admin" {
   key_name   = "admin"
   public_key = "ssh-rsa xxxxxxx"
 }


resource "aws_instance" "master-nodes" {
  ami           = var.aws_ami
  instance_type = var.aws_instance_type
  key_name      = "admin"
  count =  var.aws_master
   subnet_id = "${aws_subnet.vmtest-a.id}"
  security_groups = [
    "${aws_security_group.sg_infra.id}"
  ]

  tags = {
        Name = "master-node-${count.index}"
    }
}
worker_instance.tf file :
resource "aws_instance" "worker-nodes" {
  ami           = var.aws_ami
  instance_type = var.aws_instance_type
  key_name      = "admin"
  count =  var.aws_worker

   subnet_id = "${aws_subnet.vmtest-a.id}"
  security_groups = [
    "${aws_security_group.sg_infra.id}"
  ]

  tags = {
        Name = "worker-node-${count.index}"
    }
}
This master_instance file contains two blocks of code starting with the resource keyword. Let’s detail the first block of code in this file :
- resource : this keyword indicates that we will define a resource, which is the basic unit of Terraform. Here it is of type aws_key_pair, defining a key pair to use to connect to our EC2 instances.
- key_name : the name of the key pair, which we will use to identify it in other resources.
- public_key: the SSH public key, which will be deposited in your instances, allowing the connection via SSH.
Let’s now detail the second resource of the file which is identical in worker_instance file.
- resource : contains a resource of type aws_instance named “master-nodes” or “worker-nodes”.
- ami : the ami indicated here is the official image of the Suse Linux Enterprise 15.2 distribution for the chosen region (it varies according to the region).
- instance_type : the AWS instance type, which defines the performance of the virtual machine, here a very modest template.
- key_name : the name of the key pair to SSH into the instance, defined by the previous resource.
- count : The count meta-argument accepts a whole number, and creates that many instances of the resource or module.(only use in worker_instance)
- subnet_id : the subnet of the instance defined in the vpc.tf file
- security_groups : the security group defined in the security.tf file
In the file variables.tf we will define the default values for the instances:
- the instance type
- the number of instances worker
- the number of master instances
In the file outpu.tf fwe will define the variables which are shared between the modules
output "worker_public_ip" {
  value = aws_instance.worker-nodes.*.public_ip
}

output "master_public_ip" {
  value = aws_instance.master-nodes.public_ip
}
Usage
Let’s deploy our infrastructure :
Use terraform init command in terminal to initialize terraform and download the configuration files.
terraform-aws-infra:>$ terraform initterraform-aws-infra:>$ terraform apply
aws_key_pair.admin: Creating...
aws_vpc.vpc01: Creating...
aws_key_pair.admin: Creation complete after 1s [id=admin]
aws_vpc.vpc01: Still creating... [10s elapsed]
aws_vpc.vpc01: Creation complete after 18s [id=vpc-064ad92334ace1044]
aws_internet_gateway.gw-to-internet01: Creating...
aws_subnet.vmtest-a: Creating...
aws_security_group.sg_infra: Creating...
aws_internet_gateway.gw-to-internet01: Creation complete after 3s [id=igw-0d42dfe99486bcd75]
aws_route_table.route-to-gw01: Creating...
aws_security_group.sg_infra: Creation complete after 5s [id=sg-0d890f302629ec4b3]
aws_route_table.route-to-gw01: Creation complete after 2s [id=rtb-0313eefe1abb16a03]
aws_subnet.vmtest-a: Still creating... [10s elapsed]
aws_subnet.vmtest-a: Creation complete after 13s [id=subnet-0f0993185ee216270]
aws_instance.worker-nodes[1]: Creating...
aws_instance.worker-nodes[0]: Creating...
aws_instance.worker-nodes[2]: Creating...
aws_route_table_association.vmtest-a: Creating...
aws_instance.master-nodes[0]: Creating...
aws_route_table_association.vmtest-a: Creation complete after 1s [id=rtbassoc-095b8d604fd18b4b0]
aws_instance.master-nodes[0]: Still creating... [10s elapsed]
aws_instance.worker-nodes[1]: Still creating... [10s elapsed]
aws_instance.worker-nodes[2]: Still creating... [10s elapsed]
aws_instance.worker-nodes[0]: Still creating... [10s elapsed]
aws_instance.master-nodes[0]: Still creating... [20s elapsed]
aws_instance.worker-nodes[2]: Still creating... [20s elapsed]
aws_instance.worker-nodes[1]: Still creating... [20s elapsed]
aws_instance.worker-nodes[0]: Still creating... [20s elapsed]
aws_instance.worker-nodes[0]: Creation complete after 20s [id=i-0402c9120538c601b]
aws_instance.worker-nodes[2]: Creation complete after 21s [id=i-0875cb2fd738ba495]
aws_instance.master-nodes[0]: Creation complete after 21s [id=i-0491b675f4ffcc234]
aws_instance.worker-nodes[1]: Creation complete after 21s [id=i-02965632c8c919f17]
Apply complete! Resources: 11 added, 0 changed, 0 destroyed.
Outputs:
master_public_ip = "3.88.173.53"
worker_public_ip = [
"34.204.5.75",
"107.21.128.17",
"3.83.112.175",
]
terraform-aws-infra:>After a few minutes our instances are up running
Tear down the whole Terraform plan with :
terraform-aws-infra:>$ terraform destroy -forceResources can be destroyed using the terraform destroy command, which is similar to terraform apply but it behaves as if all of the resources have been removed from the configuration.
Let’s have a look at the console:

We have our 4 instances created.
Remote control
Now we are now going to connect via SSH to one of the newly created EC2 instances, for example the master-node-0 instance. For this we use the previously generated SSH key and the user ec2-user and with the Public IPv4 DNS :

terraform-aws-infra:> $ ssh ec2-user@ec2-54-86-238-204.compute-1.amazonaws.com -i ssh-keys/id_rsa_aws
Last login: Wed Jun 23 07:31:22 2021 from 85.5.240.185
SUSE Linux Enterprise Server 15 SP2 x86_64 (64-bit)

As "root" (sudo or sudo -i) use the:
  - zypper command for package management
  - yast command for configuration management

Management and Config: https://www.suse.com/suse-in-the-cloud-basics
Documentation: https://www.suse.com/documentation/sles-15/
Forum: https://forums.suse.com/categories/suse-public-cloud

Have a lot of fun...
ec2-user@ip-10-1-0-87:~> cat /etc/os-release
NAME="SLES"
VERSION="15-SP2"
VERSION_ID="15.2"
PRETTY_NAME="SUSE Linux Enterprise Server 15 SP2"
ID="sles"
ID_LIKE="suse"
ANSI_COLOR="0;32"
CPE_NAME="cpe:/o:suse:sles:15:sp2"
ec2-user@ip-10-1-0-87:~>
We get a shell on the newly created EC2 instance.
Conclusion
With Terraform, it easy and fast it is to create an AWS Virtual Machines infrastructure.
Terraform is one of the most popular Infrastructure-as-code (IaC) tool used by DevOps teams to automate infrastructure tasks. It is used to automate the provisioning of your cloud resources.. It is currently the best tool to automate your infrastructure creation.
It supports multiple providers such as AWS, Azure, Oracle, GCP, and many more.
Next step : install a kubernetes cluster on this infrastructure .


