Installing Kubernetes on AWS our infrastructure with Terraform and kubeadm
We will resume our infrastructure created in the previous post: Our first AWS infrastructure since Terraform and modify it to add the deployment of a kubernetes cluster on 4 nodes. To execute this tutorial you need to set up the infrastructure deployed in this previous post.
Terraform establishes a .tfstate file. This file allows Terraform to easily retrieve the current state of the infrastructure and update it to launch other operations on it.
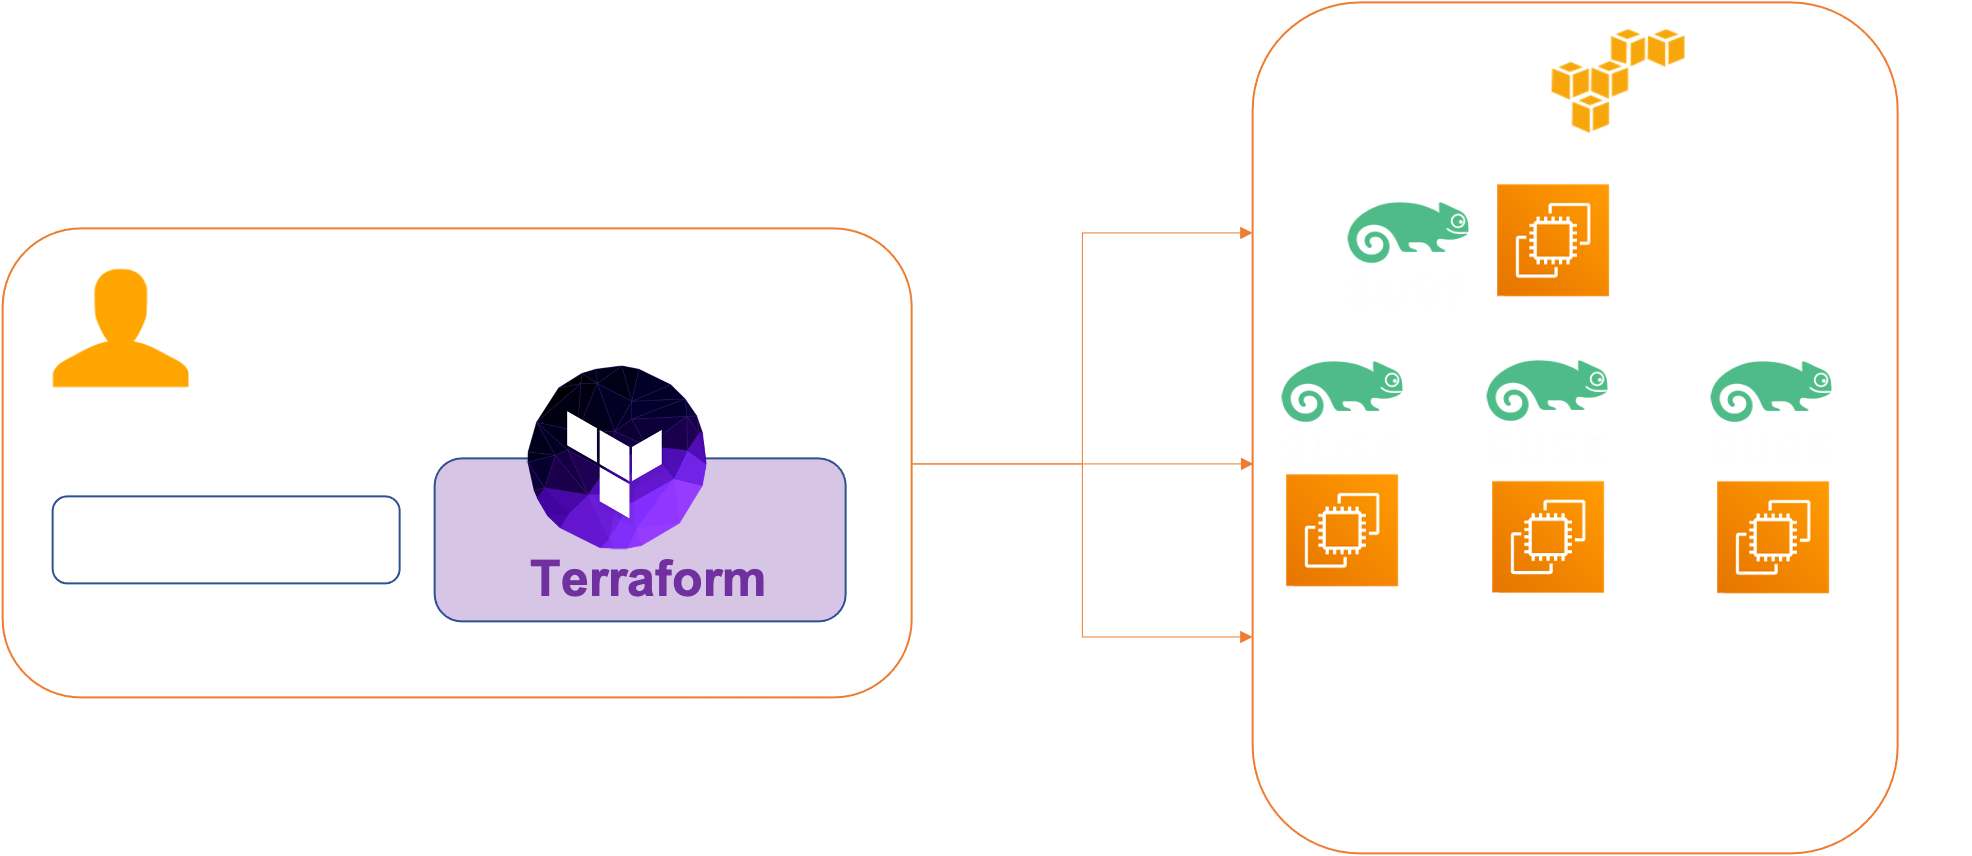
Architecture
We have 4 VMs :
- master-node-0
- worker-node-0
- worker-node-1
- worker-node-2
Prerequisites
Before you get started, you’ll need to have these things:
- Terraform > 0.13.x
- kubectl installed on the compute that hosts terraform
- An AWS account with the IAM permissions
- AWS CLI : the AWS CLI Documentation
- An AWS Infrastructure with 4 VMs : Our first AWS infrastructure since Terraform
Initial setup
We will modify our template files master_instance.tf and worker_instance.tf. The modified files are located in the k8snodes directory :master_instance.tf , worker_instance.tf
In the master_instance.tf and worker_instance.tf file we will modify the aws_instance resource and add a remote-exec, local-exec provisioner and an external entry
master_instance :
provisioner "remote-exec" {
inline = [
<<EOH

set -x
sudo /usr/sbin/swapoff -a
sleep 60

sudo wget https://github.com/mikefarah/yq/releases/download/v4.2.0/yq_linux_amd64.tar.gz -O - | sudo tar xz && sudo mv yq_linux_amd64 /usr/bin/yq

sudo modprobe overlay
sudo modprobe br_netfilter
sudo  sh -c 'echo net.ipv4.ip_forward=1 >> /etc/sysctl.conf'
sudo  sh -c 'echo net.ipv4.ip_forward=1 >> /etc/sysctl.conf'
sudo  sh -c 'echo net.ipv4.conf.all.forwarding=1 >> /etc/sysctl.conf'
sudo  sh -c 'echo net.bridge.bridge-nf-call-iptables=1 >> /etc/sysctl.conf'
sudo sysctl -p

sudo zypper addrepo https://download.opensuse.org/repositories/home:so_it_team/openSUSE_Leap_15.3/home:so_it_team.repo
sudo sed -i 's/gpgcheck=1/gpgcheck=0/' /etc/zypp/repos.d/home_so_it_team.repo

sudo zypper install -y cri-o cri-tools
sudo zypper install -y kubernetes1.20-client
sudo zypper install -y podman
sudo zypper rm -y docker
sudo systemctl start crio
sudo systemctl enable kubelet
sudo systemctl start kubelet
sudo systemctl daemon-reload

sudo wget https://raw.githubusercontent.com/colussim/terraform-aws-infra/main/k8sconf/setk8sconfig.yaml -O /tmp/setk8sconfig.yaml
sudo /usr/bin/kubeadm init --config /tmp/setk8sconfig.yaml

mkdir -p $HOME/.kube && sudo /bin/cp /etc/kubernetes/admin.conf $HOME/.kube/config
sudo chown $(id -u):$(id -g) $HOME/.kube/config

/usr/bin/kubectl apply -f https://cloud.weave.works/k8s/net?k8s-version=$(kubectl version | base64 | tr -d '\n')
/usr/bin/kubectl apply -f https://raw.githubusercontent.com/kubernetes/dashboard/master/aio/deploy/recommended.yaml
/usr/bin/kubectl apply -f https://raw.githubusercontent.com/colussim/terraform-aws-infra/main/k8sconf/clusteradmin.yaml


EOH
]
connection {
              type        = "ssh"
              user        = "ec2-user"
              host     = aws_instance.master-nodes.public_ip
              private_key = file(var.private_key)
      }
}
provisioner "local-exec" {
    command    = "./k8sconf/getkubectl-conf.sh ${self.public_ip}"
}

tags= {
      Name = "master-node-0"
  }
}

data "external" "kubeadm_join" {
program = ["./k8sconf/kubeadm-token.sh"]

query = {
  host = aws_instance.master-nodes.public_ip
}
depends_on = [aws_instance.master-nodes]

}
worker_instance
resource "aws_instance" "worker-nodes" {
  ami           = var.aws_ami
  instance_type = var.aws_instance_type
  key_name      = "admin"
  count =  var.aws_worker

   subnet_id = "${aws_subnet.vmtest-a.id}"
  security_groups = [
    "${aws_security_group.sg_infra.id}"
  ]
  provisioner "remote-exec" {
  inline = [
  <<EOH

  set -x
  sudo /usr/sbin/swapoff -a
  sleep 60

  sudo wget https://github.com/mikefarah/yq/releases/download/v4.2.0/yq_linux_amd64.tar.gz -O - | sudo tar xz && sudo mv yq_linux_amd64 /usr/bin/yq

  sudo modprobe overlay
  sudo modprobe br_netfilter
  sudo  sh -c 'echo net.ipv4.ip_forward=1 >> /etc/sysctl.conf'
  sudo  sh -c 'echo net.ipv4.ip_forward=1 >> /etc/sysctl.conf'
  sudo  sh -c 'echo net.ipv4.conf.all.forwarding=1 >> /etc/sysctl.conf'
  sudo  sh -c 'echo net.bridge.bridge-nf-call-iptables=1 >> /etc/sysctl.conf'
  sudo sysctl -p

  sudo zypper addrepo https://download.opensuse.org/repositories/home:so_it_team/openSUSE_Leap_15.3/home:so_it_team.repo
  sudo sed -i 's/gpgcheck=1/gpgcheck=0/' /etc/zypp/repos.d/home_so_it_team.repo
  sudo zypper install -y cri-o cri-tools
  sudo zypper install -y kubernetes1.20-client
  sudo zypper install -y podman
  sudo zypper rm -y docker
  sudo systemctl start crio
  sudo systemctl enable kubelet
  sudo systemctl start kubelet
  sudo systemctl daemon-reload

  sudo ${data.external.kubeadm_join.result.command}
  mkdir -p $HOME/.kube


EOH
]
connection {
                type        = "ssh"
                user        = "ec2-user"
                host     = "${self.public_ip}"
                private_key = file(var.private_key)
        }
}
provisioner "local-exec" {
      command    = "./k8sconf/setkubectl.sh ${self.public_ip}"
  }


  tags = {
        Name = "worker-node-${count.index}"
    }
}
Usage
Create an bare-metal Kubernetes cluster with one master and three nodes:
$ terraform applyTear down the whole Terraform plan with :
$ terraform destroy -forceWithin minutes your kubernetes cluster is deployed
aws_instance.worker-nodes[0] (local-exec): node/ip-10-1-0-171 labeled
aws_instance.worker-nodes[0]: Creation complete after 6m2s [id=i-0a64d48a4e19e945e]
aws_instance.worker-nodes[2] (local-exec): node/ip-10-1-0-58 labeled
aws_instance.worker-nodes[2]: Creation complete after 6m2s [id=i-02008589e537d1c55]
aws_instance.worker-nodes[1] (local-exec): node/ip-10-1-0-46 labeled
aws_instance.worker-nodes[1]: Creation complete after 6m3s [id=i-0735750894d041771]

Apply complete! Resources: 4 added, 1 changed, 4 destroyed.

Outputs:

kubeadm_join_command = "data.external.kubeadm_join.result['command']"
master_public_ip = "3.89.138.119"
worker_public_ip = [
  "3.86.77.122",
  "18.212.162.82",
  "3.86.99.122",
]
Remote control
Check if your cluster works:
Your kubernetes cluster bind on local ip addresses you can create an AWS Site-to-Site connection AWS Site-to-Site to be able to eat the cluster from your workstation or more simply connect with ssh on the master node.We will use the ssh method.
$ ssh  -o StrictHostKeyChecking=no -o UserKnownHostsFile=/dev/null -i ssh-keys/id_rsa_aws ec2-user@3.89.138.119
$ kubectl get nodes
NAME            STATUS   ROLES                  AGE   VERSION
ip-10-1-0-171   Ready    worker                 20m   v1.20.2
ip-10-1-0-46    Ready    worker                 20m   v1.20.2
ip-10-1-0-58    Ready    worker                 20m   v1.20.2
ip-10-1-1-14    Ready    control-plane,master   26m   v1.20.2
$
To access the dashboard you’ll need to find its cluster IP :
$ kubectl -n kubernetes-dashboard get svc --selector=k8s-app=kubernetes-dashboard

NAME                   TYPE        CLUSTER-IP       EXTERNAL-IP   PORT(S)   AGE
kubernetes-dashboard   ClusterIP   10.96.51.199     <none>        443/TCP   143m
$
Get token for the connection to the dashboard :
$ kubectl -n kube-system describe secret $(kubectl -n kube-system get secret | awk '/^deployment-controller-token-/{print $1}') | awk '$1=="token:"{print $2}'
eyJhbGciOiJSUzI1NiIsImtpZCI6Ijd1MlVaQUlJMmdTTERWOENacm9TM0pTQ0FicXoyaDhGbnF5R1
7aM-uyljuv9ahDPkLJKJ0cnen1YDcsswwdIYL3mnW3b1E07zOR99w2d_PM_4jlFXnFt4TvIQ7YY57L
2DDo60vlD1w3lI0z_ogT8sj5Kk1srPE3L6TuIOqWfDSaMNe65gK0j5OJiTO7oEBG5JUgXbwGb8zOK
iPPQNvwrBu6updtqpI1tnU1A4lKzV70GS7pcoqqHMl26D1l0C4-IbZdd1oFJz3XnbTNy70WEMiVp
2O8F1EKCYYpQ
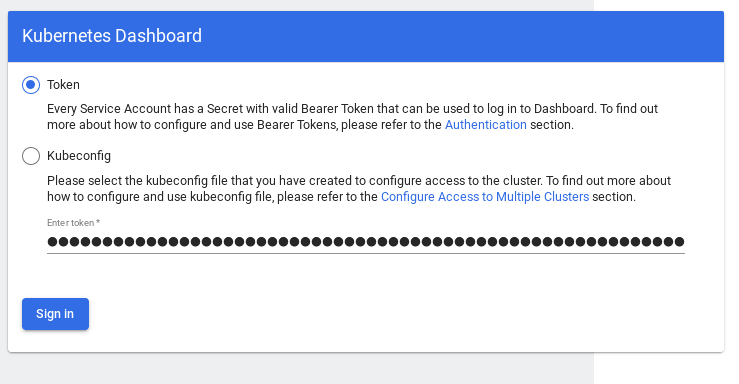
$copy and paste the token value in the dashboard connection window (in next step)
Open a SSH tunnel:
$ ssh -L 8888:10.96.51.199:443 -o StrictHostKeyChecking=no -o UserKnownHostsFile=/dev/null -i ssh-keys/id_rsa_aws ec2-user@3.89.138.119Now you can access the dashboard on your computer at http://localhost:8888. Paste the token value :
Conclusion
With kubeadm and Terraform, booting a Kubernetes cluster can be done with a single command and it only takes four minutes to get a fully functional configuration. You now have a basic understanding of how to use Terraform. You’ll notice that the Terraform code remains easy to read and simplifies the exact description of the infrastructure you want to create.
Next step : deploy an application in our cluster .
Resources :
 Terraform Documentation
AWS Build Infrastructure
 AWS CLI