MySQL InnoDB Cluster on AWS using Kubernetes and StatefulSets
We will resume our infrastructure created in the previous post: Installing Kubernetes on AWS infrastructure with Terraform and kubeadm. We will add storage to each worker nodes and install OpenEBS on our kubernetes cluster.In this post I won’t detail the OpenEBS installation part, I strongly advise you to see the following posts:
- Using HELM Chart to Deploying OpenEBS to an Kubernetes Cluster using Terraform
- OpenEBS CStor CSI Driver
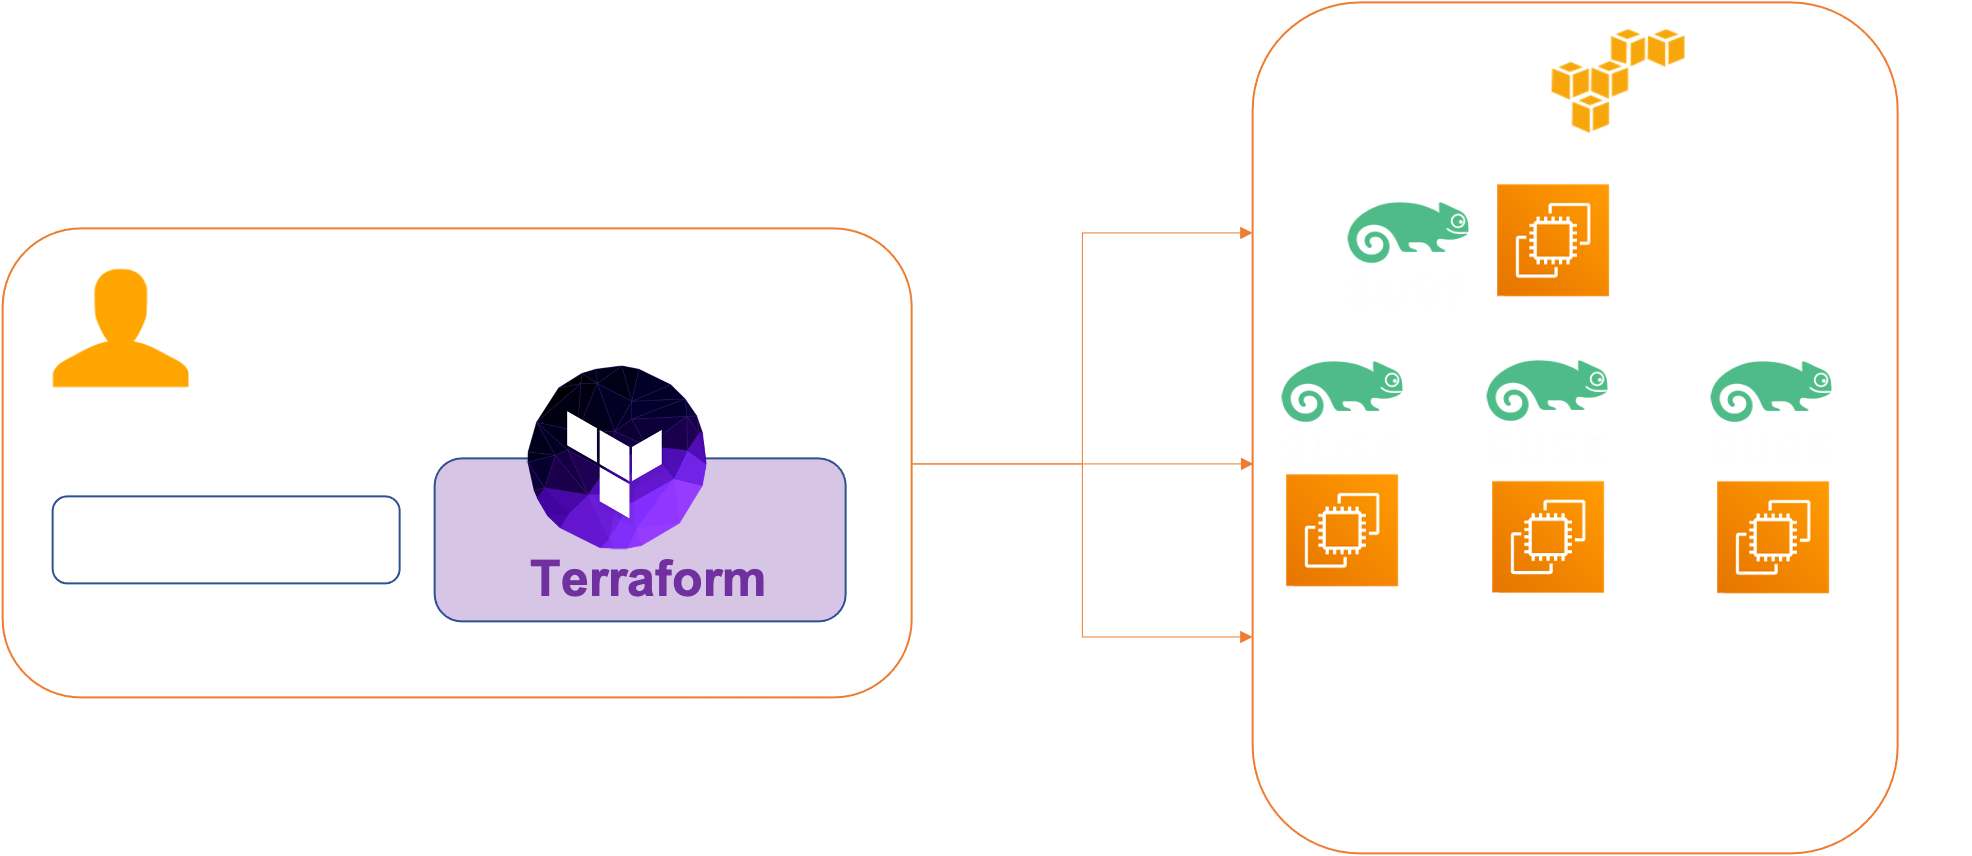
To execute this tutorial you need to set up the infrastructure deployed in this previous post. We will use a terraform template to create our volumes on each workers instances.
Architecture
We have 4 VMs :
- master-node-0
- worker-node-0
- worker-node-1
- worker-node-2
Prerequisites
Before you get started, you’ll need to have these things:
- Terraform > 0.13.x
- kubectl installed on the compute that hosts terraform
- An AWS account with the IAM permissions
- AWS CLI : the AWS CLI Documentation
- An AWS Infrastructure with 4 VMs : Installing Kubernetes on AWS infrastructure with Terraform and kubeadm.
- HELM > 3.0.x
Initial setup
We are going to add two volumes of type EBS (Elastic Block Store) of 20 Gb to each of our Worker instances . And we will deploy our OpenEBS afterwards which will use these volumes.
Provisioning EBS volume and attaching it to a Terraform EC2 worker instance.
Elastic Block Store are disk volumes which can be attached to EC2 instances. EBS volumes exist independently, meaning their lifecycle is not dependent on the EC2 instance they are attached to.
Step 1 : get id for each worker instance : run run the following commands :
$ cd addstorage
$ aws ec2 describe-instances --filters "Name=tag:Name,Values=worker-node-*" | jq -r '.Reservations[].Instances[].InstanceId'
i-02008589e537d1c55
i-0735750894d041771
i-0a64d48a4e19e945e
Modify the file variables.tf in the directory : addstorage You should modify the worker_instance_id entry with the id values of your instances and the worker_zone entry with your working zone.
variable "volume_count" {
  default = 2
  description = "Number of disk by instance"
}

variable "volume_size" {
  default = "20"
  description = "Size for volume default : 20 GB"
}

variable "device_names" {
    type = list
    default = ["/dev/sdh", "/dev/sdi"]
    description = "device name"
}


variable "worker_instance_id" {
    type = list
    default = ["i-02008589e537d1c55", "i-0735750894d041771", "i-0a64d48a4e19e945e"]
    description = "Instance id for worker node"
}

variable "worker_instance_count" {
  default = 3
  description = "Number worker Instance"
}

variable "worker_zone" {
  default = "us-east-1a"
}
Usage
Create EBS volume and attaching it to worker instance
$ terraform applyTear down the whole Terraform plan with :
$ terraform destroy -forceIn a few seconds your volumes are created
aws_volume_attachment.volume_attachement[3]: Still creating... [10s elapsed]
aws_volume_attachment.volume_attachement[0]: Still creating... [10s elapsed]
aws_volume_attachment.volume_attachement[5]: Still creating... [10s elapsed]
aws_volume_attachment.volume_attachement[1]: Still creating... [10s elapsed]
aws_volume_attachment.volume_attachement[2]: Still creating... [10s elapsed]
aws_volume_attachment.volume_attachement[4]: Still creating... [10s elapsed]
aws_volume_attachment.volume_attachement[4]: Still creating... [20s elapsed]
aws_volume_attachment.volume_attachement[5]: Still creating... [20s elapsed]
aws_volume_attachment.volume_attachement[1]: Still creating... [20s elapsed]
aws_volume_attachment.volume_attachement[2]: Still creating... [20s elapsed]
aws_volume_attachment.volume_attachement[0]: Still creating... [20s elapsed]
aws_volume_attachment.volume_attachement[3]: Still creating... [20s elapsed]
aws_volume_attachment.volume_attachement[2]: Creation complete after 24s [id=vai-3072910826]
aws_volume_attachment.volume_attachement[3]: Creation complete after 24s [id=vai-1459374052]
aws_volume_attachment.volume_attachement[4]: Creation complete after 24s [id=vai-3167473819]
aws_volume_attachment.volume_attachement[0]: Creation complete after 24s [id=vai-3950277743]
aws_volume_attachment.volume_attachement[1]: Creation complete after 24s [id=vai-7366539]
aws_volume_attachment.volume_attachement[5]: Creation complete after 24s [id=vai-2515893038]

Apply complete! Resources: 12 added, 0 changed, 0 destroyed.
Use the lsblk (on each worker nodes) to view any volumes that were mapped at launch but not formatted and mounted.
$ ssh  -o StrictHostKeyChecking=no -o UserKnownHostsFile=/dev/null -i ssh-keys/id_rsa_aws ec2-user@x.x.x.x


ec2-user@ip-10-1-1-14:~> lsblk
NAME        MAJ:MIN RM  SIZE RO TYPE MOUNTPOINT
nvme0n1     259:0    0   10G  0 disk
├─nvme0n1p1 259:1    0  300M  0 part /boot
└─nvme0n1p2 259:2    0  9.7G  0 part /
nvme1n1     259:3    0   20G  0 disk
└─nvme1n1p1 259:4    0   20G  0 part
nvme2n1     259:5    0   20G  0 disk
└─nvme2n1p1 259:6    0   20G  0 part
we have our two 20 Gb disks (nvme1n1 nvme2n1) attached to our instance.
Now let’s install our distributed storage OpenEBS. We will use the storage class sc-cstor-csi-student1 and set it as default storage class
ec2-user@ip-10-1-0-87:~> kubectl get sc|grep student1

NAME                    PROVISIONER                   RECLAIMPOLICY   VOLUMEBINDINGMODE      ALLOWVOLUMEEXPANSION   AGE
sc-cstor-csi-student1  cstor.csi.openebs.io               Delete          Immediate          true                    8s
ec2-user@ip-10-1-0-87:~>
Mark a StorageClass as default:
ec2-user@ip-10-1-0-87:~> kubectl patch storageclass sc-cstor-csi-student1 -p '{"metadata": {"annotations":{"storageclass.kubernetes.io/is-default-class":"true"}}}'
storageclass.storage.k8s.io/sc-cstor-csi-student1 patched
ec2-user@ip-10-1-0-87:~>
Verify that your chosen StorageClass is default:
ec2-user@ip-10-1-0-87:~> kubectl get sc|grep student1
NAME                              PROVISIONER           RECLAIMPOLICY   VOLUMEBINDINGMODE      ALLOWVOLUMEEXPANSION   AGE
sc-cstor-csi-student1 (default)   cstor.csi.openebs.io     Delete          Immediate              true                29s
ec2-user@ip-10-1-0-87:~>
Installing the MySQL InnoDB Cluster
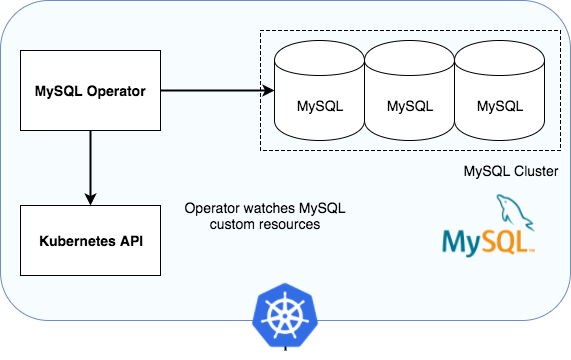
For the deployment of our MYSQL cluster we will use the MYSQL operator for kubernetes. The MYSQL Operator for Kubernetes is an Operator for Kubernetes managing MySQL InnoDB Cluster setups inside a Kubernetes Cluster. The MySQL Operator manages the full lifecycle with setup and maintenance including automation of upgrades and backup.
The MySQL Operator for Kubernetes currently is in a preview state. DO NOT USE IN PRODUCTION.
Installing the MySQL Operator
We lets create a unique namespace for the mysql-operator
ec2-user@ip-10-1-0-87:~> kubectl create ns mysql-operator
namespace/mysql-operator created
ec2-user@ip-10-1-0-87:~>
we will also create a namespace for our MYSQL cluster
ec2-user@ip-10-1-0-87:~> kubectl create ns innodb-cluster
namespace/innodb-cluster created
ec2-user@ip-10-1-0-87:~>
The MYSQL Operator can be installed using kubectl:
ec2-user@ip-10-1-0-87:~> kubectl apply -f https://raw.githubusercontent.com/mysql/mysql-operator/trunk/deploy/deploy-crds.yaml
customresourcedefinition.apiextensions.k8s.io/innodbclusters.mysql.oracle.com created
customresourcedefinition.apiextensions.k8s.io/mysqlbackups.mysql.oracle.com created
customresourcedefinition.apiextensions.k8s.io/clusterkopfpeerings.zalando.org created
customresourcedefinition.apiextensions.k8s.io/kopfpeerings.zalando.org created
ec2-user@ip-10-1-0-87:~>
ec2-user@ip-10-1-0-87:~> kubectl apply -f https://raw.githubusercontent.com/mysql/mysql-operator/trunk/deploy/deploy-operator.yaml
serviceaccount/mysql-sidecar-sa created
clusterrole.rbac.authorization.k8s.io/mysql-operator created
clusterrole.rbac.authorization.k8s.io/mysql-sidecar created
clusterrolebinding.rbac.authorization.k8s.io/mysql-operator-rolebinding created
clusterkopfpeering.zalando.org/mysql-operator created
namespace/mysql-operator configured
serviceaccount/mysql-operator-sa created
deployment.apps/mysql-operator created
ec2-user@ip-10-1-0-87:~>
Verify the operator is running :
ec2-user@ip-10-1-0-87:~> kubectl get deployment -n mysql-operator mysql-operator
NAME             READY   UP-TO-DATE   AVAILABLE   AGE
mysql-operator   1/1     1            1           75s
ec2-user@ip-10-1-0-87:~>
Create a secret containing credentials for a MySQL root user
ec2-user@ip-10-1-0-87:~> kubectl create secret generic  mypwds \
        --from-literal=rootUser=root \
        --from-literal=rootHost=% \
        --from-literal=rootPassword="Your Password"
secret/mypwds created
ec2-user@ip-10-1-0-87:~>
We will now create our InnoDB cluster with 1 router and 3 instances
We will use the following yaml file: mysql-innodb-cluster.yaml
apiVersion: mysql.oracle.com/v2alpha1
kind: InnoDBCluster
metadata:
  name: mycluster01
spec:
  secretName: mypwds
  instances: 3
  router:
instances: 1ec2-user@ip-10-1-0-87:~> kubectl apply -f https://raw.githubusercontent.com/colussim/terraform-aws-infra/main/myssql/mysql-innodb-cluster.yaml
innodbcluster.mysql.oracle.com/mycluster01 createdec2-user@ip-10-1-0-87:~> kubectl get service mycluster01
NAME TYPE CLUSTER-IP EXTERNAL-IP PORT(S) AGE
mycluster01 ClusterIP 10.105.48.54
kubectl get cstorvolume –all-namespaces NAMESPACE NAME CAPACITY STATUS AGE openebs pvc-36754aff-5d7c-42e9-86d5-6045dbbb29b9 2Gi Init 35m openebs pvc-c52e0f7c-9594-4175-b217-f54f1065c9da 1Gi Healthy 86m
https://raw.githubusercontent.com/colussim/terraform-aws-infra/main/myssql/mysql-innodb-cluster.yaml
Create a PVCs yaml using above created StorageClass name
First we are creating three persistent volumes (mysqldata01-mysqldata03) for our InnoDB Cluster nodes. We are specifying that this volume can only be accessed by one node (ReadWriteOnce) We are also specifying that we will use our StorageClass for storage. More information on PV here.
kind: PersistentVolumeClaim
apiVersion: v1
metadata:
  name: mysqldata01-cstor-vol-student1
spec:
  storageClassName: sc-cstor-csi-student1
  accessModes:
    - ReadWriteOnce
  resources:
    requests:
      storage: 10Gi
---
kind: PersistentVolumeClaim
apiVersion: v1
metadata:
  name: mysqldata02-cstor-vol-student1
spec:
  storageClassName: sc-cstor-csi-student1
  accessModes:
    - ReadWriteOnce
  resources:
    requests:
      storage: 10Gi
--
kind: PersistentVolumeClaim
apiVersion: v1
metadata:
  name: mysqldata03-cstor-vol-student1
spec:
  storageClassName: sc-cstor-csi-student1
  accessModes:
    - ReadWriteOnce
  resources:
    requests:
      storage: 10Gi
Create a PVC using above example.
We will use the following yaml file: create_pvc_csi.yaml
ec2-user@ip-10-1-0-87:~> kubectl create -f https://raw.githubusercontent.com/colussim/terraform-aws-infra/main/csi/create_pvc_csi.yaml -n mysql-cluster01
persistentvolumeclaim/mysqldata01-cstor-vol-student1 created
persistentvolumeclaim/mysqldata02-cstor-vol-student1 created
persistentvolumeclaim/mysqldata03-cstor-vol-student1 created
ec2-user@ip-10-1-0-87:~>
Verify if PVCs : mssqldata0x-cstor-vol-student1 are created successfully using the following command.
ec2-user@ip-10-1-0-87:~> kubectl get pvc -n mysql-cluster01

NAME                             STATUS   VOLUME                                     CAPACITY   ACCESS MODES   STORAGECLASS      AGE
mysqldata01-cstor-vol-student1   Bound    pvc-8827edd0-3bc4-4c19-a739-1deec13ce8ed   10Gi        RWO            sc-cstor-csi-student1   29s
mysqldata02-cstor-vol-student1   Bound    pvc-68e6f138-7870-472b-a060-2cb083714972   10Gi        RWO            sc-cstor-csi-student1   26s
mysqldata03-cstor-vol-student1   Bound    pvc-88b712ca-2206-48e8-a691-e467ae72a9e0   10Gi        RWO            sc-cstor-csi-student1   23s
ec2-user@ip-10-1-0-87:~>
Verify volume and its replicas are in Healthy state.
$ kubectl get cstorvolume -n openebs
NAME                                       CAPACITY   STATUS    AGE
pvc-68e6f138-7870-472b-a060-2cb083714972   10Gi       Healthy   10m
pvc-8827edd0-3bc4-4c19-a739-1deec13ce8ed   10Gi       Healthy   11m
pvc-88b712ca-2206-48e8-a691-e467ae72a9e0   10Gi       Healthy   10m
$
Deployment of a database instance
The next part is coming …