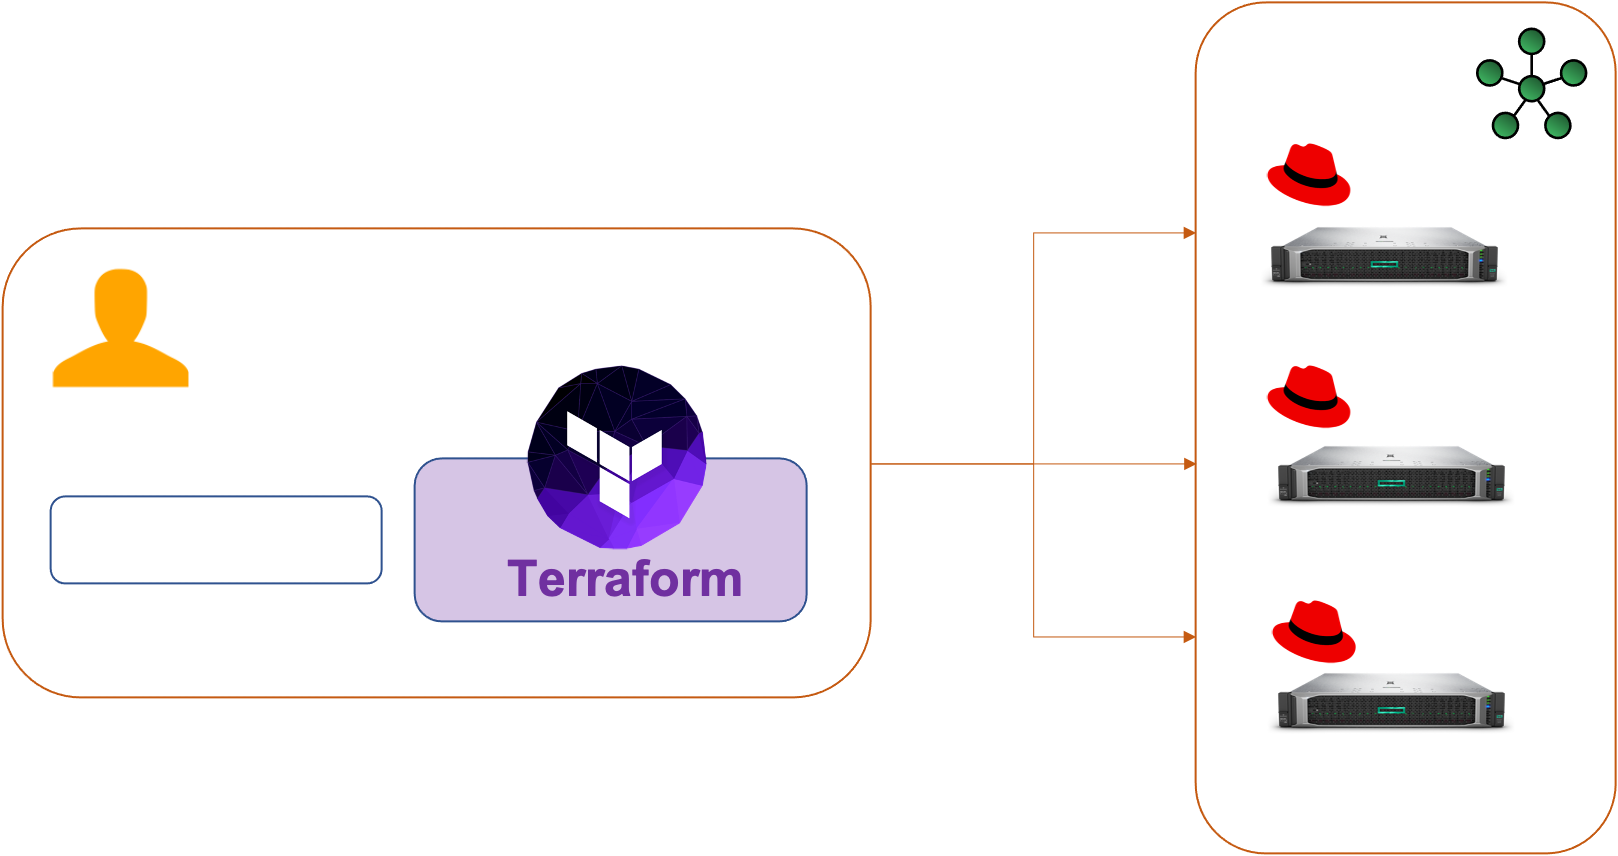
Using HELM Chart to Deploying OpenEBS to an Kubernetes Cluster using Terraform
After having been interested in the pure kubernetes storage management part proposed by HPE : HPE Ezmeral Data Fabric (formerly MapR Data Platform) delivered with their large scale containerized application deployment and management tool : HPE Ezmeral Container Platform,i wanted to test a more lite kubernetes storage solution.
I chose a native kubernetes OpenEBS solution ! 
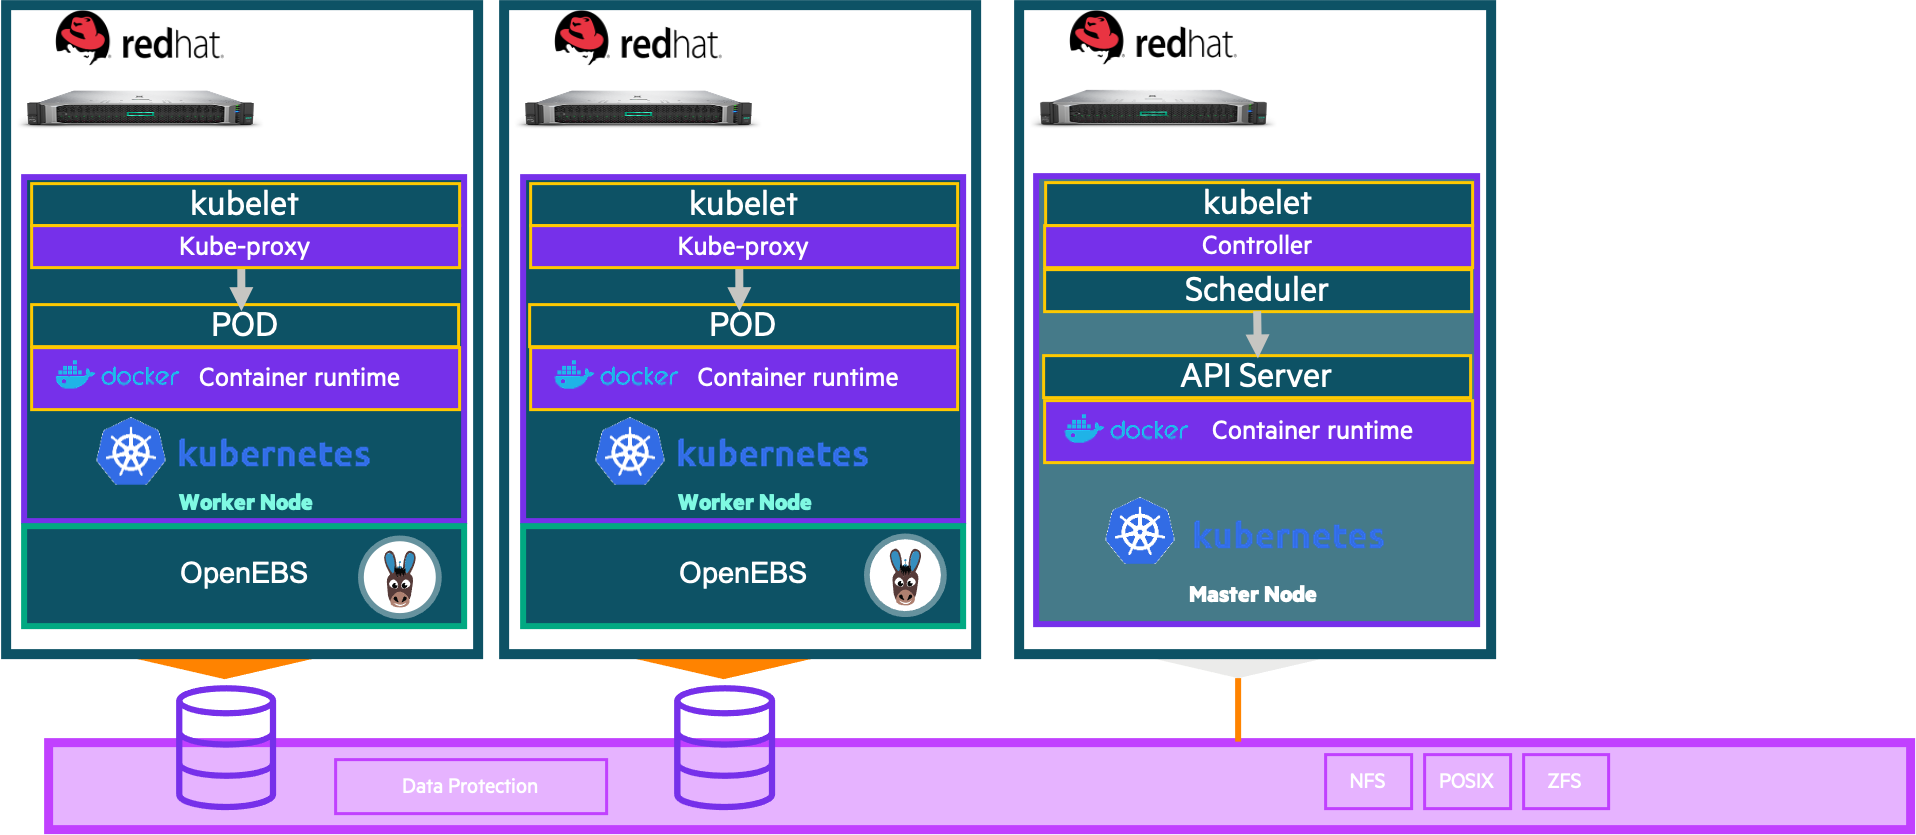
This tool provides storage for Kubernetes stateful workloads using Kubernetes itself for storage management. OpenEBS can for example use the storage available on the cluster nodes to create replicated volumes! The architecture of this solution is really interesting because we can see the philosophy of microservices applied to storage. With these 6800 stars on Github, the project already has a good community.
I wanted to continue using Terraform for OpenEBS deployment using the HELM provider

The OpenEBS data plane offers three choices of storage engines: cStor, Jiva, and Local PV.
cStor is the preferred storage engine of OpenEBS. It’s a lightweight and feature-rich storage engine meant for HA workloads like databases. It provides enterprise-grade features including synchronous data replication, snapshots, clones, thin provisioning of data, high resiliency of data, data consistency and on-demand increase of capacity or performance. cStor’s synchronous replication delivers high availability to stateful Kubernetes Deployments with just a single replica. When the stateful application desires the storage to provide high availability of data, cStor is configured to have 3 replicas where data is written synchronously to all the three replicas. Since data is written to multiple replicas, terminating and scheduling a new Pod in a different Node doesn’t result in data loss.
Jiva is the first storage engine that was included in the early versions of OpenEBS. Jiva is the simplest of the available choices, which runs entirely in the user space with standard block storage capabilities such as synchronous replication. Jiva is ideal for smaller applications running on nodes that may not have the option to add additional block storage devices. So, it is not suitable for mission-critical workloads that demand high performance or advanced storage capabilities.
OpenEBS third and simplest storage engine is Local Persistent Volume (Local PV). A Local PV represents a local disk directly attached to a single Kubernetes Node.
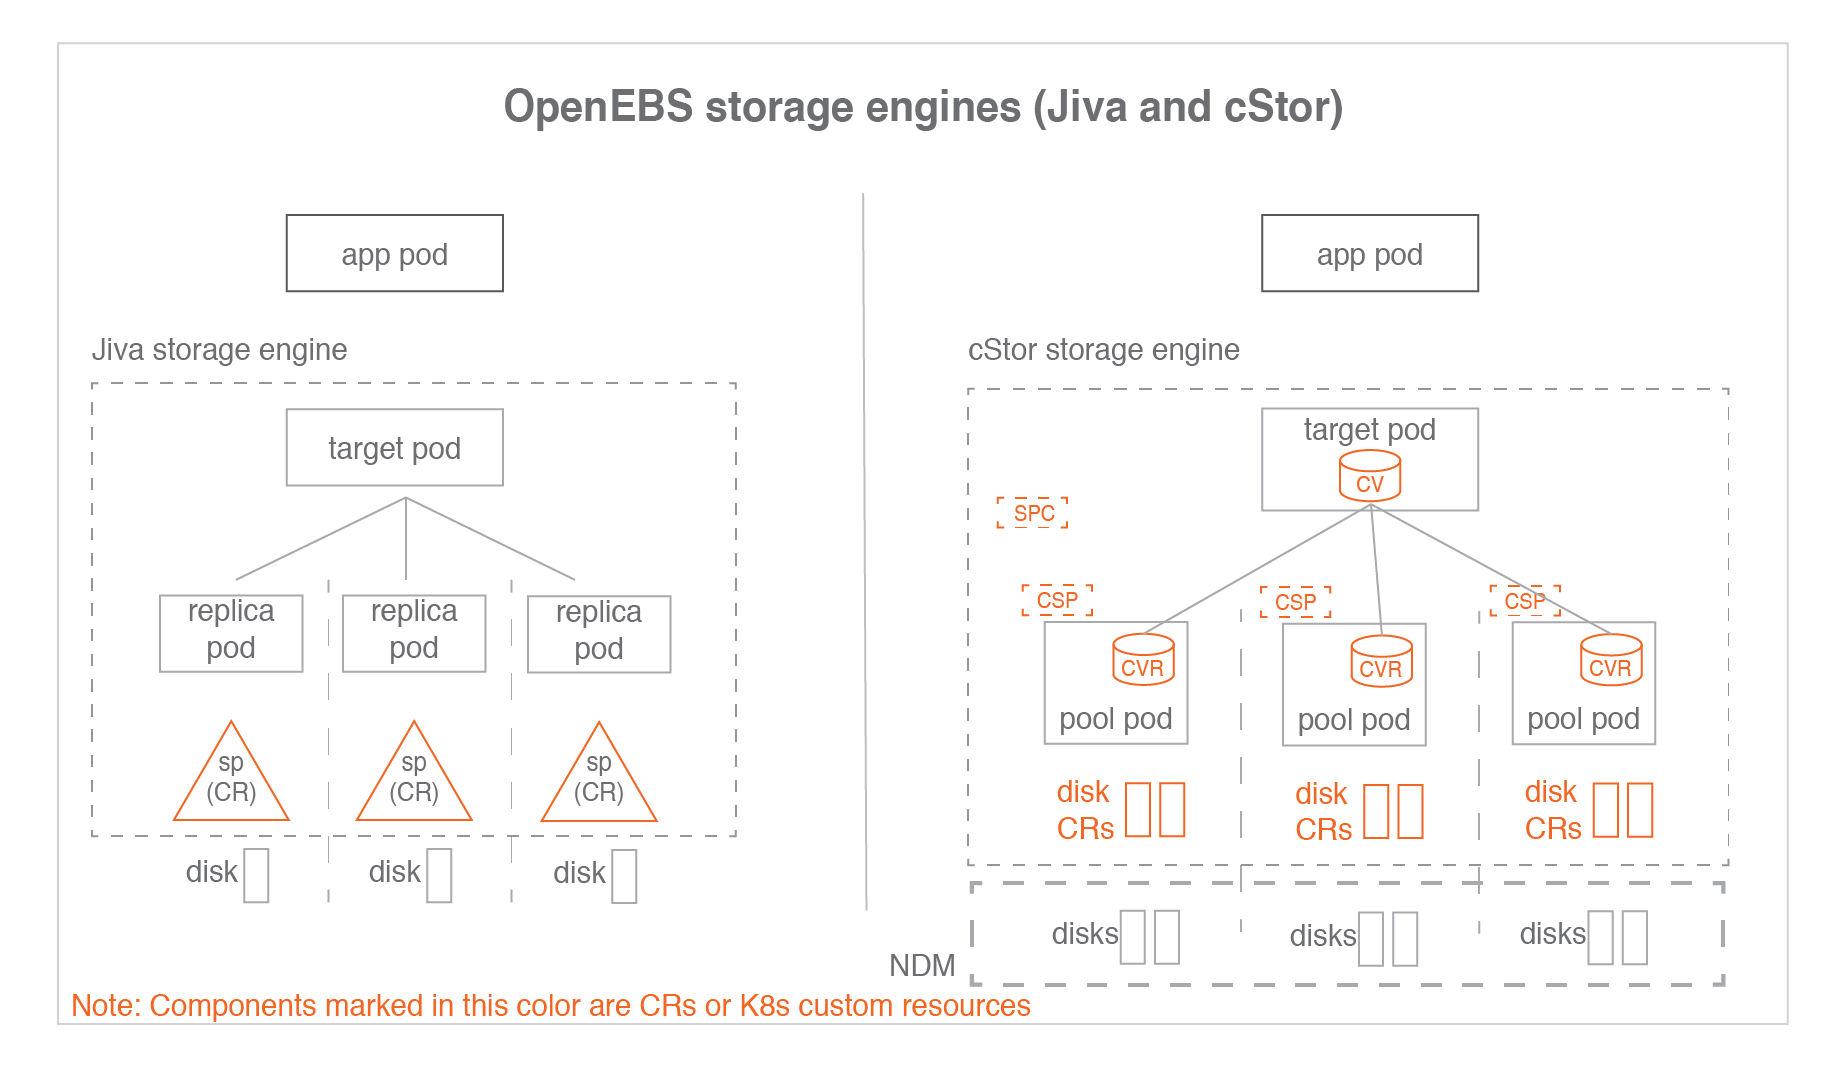
For more information on the OpenEBS architecture :
In this post you will see :
- How to deploy OpenEBS with Terraform
- Creating a StoragePool
- Creating a Storage Class
- Provisioning a Persistent Volume Claim
- Deploying a SQL Server instance on an OpenEBS storage
- Restore Database
Prerequisites
Before you get started, you’ll need to have these things:
- Terraform > 0.13.x
- HELM > 3.0.x
- Kubernetes 1.13+ with RBAC enabled
- iSCSI PV support in the underlying infrastructure
- Storage disk available in each workers nodes
- kubernetes config file on Terraform platform (setup path in maint.tf file)
Infra
Initial setup
Clone the repository and install the dependencies:
$ git clone https://github.com/colussim/openebsdeploy-terraform.git
$ cd openebsdeploy-terraform
$ terraform init
Usage
Deploy OpenEBS:
$ terraform apply \
 -var="namespace=epc-openebs" \
If you use the terraform apply command without parameters the default values will be those defined in the variables.tf file.
This will do the following :
- create a namespace
- create a deployment object for OpenEBS
Tear down the whole Terraform plan with :
$ terraform destroy -forceResources can be destroyed using the terraform destroy command, which is similar to terraform apply but it behaves as if all of the resources have been removed from the configuration.
Verifying OpenEBS installation
Verify pods:
Wait for some time to see all the pods in the running state in the OpenEBS namespace (dans cette exemple le namespace est epc-openebs) :
$ kubectl get pods -n epc-openebs

NAME                                               READY   STATUS    RESTARTS   AGE
epc-openebs-admission-server-6559b8875f-khs27      1/1     Running   0          35h
epc-openebs-apiserver-d956f7fc6-h7gxk              1/1     Running   0          5d15h
epc-openebs-localpv-provisioner-5594c6f4c9-tbzxw   1/1     Running   0          35h
epc-openebs-ndm-d6t68                              1/1     Running   4          35h
epc-openebs-ndm-k2l72                              1/1     Running   0          5d15h
epc-openebs-ndm-operator-6f94f484b5-nr7n6          1/1     Running   0          35h
epc-openebs-provisioner-58449b68bc-5cjzd           1/1     Running   0          5d15h
epc-openebs-snapshot-operator-74b8449d5c-m7lz7     2/2     Running   0          5d15h
$
The pods epc-openebs-ndm-xxx should be running on all worker nodes or on the nodes that are selected through nodeSelector configuration. This pod is responsible for scanning the host for the block devices that can be used by the applications. As we need to check the devices mount in all the nodes this pod is deployed as a daemonset.
We have a pod named epc-openebs-apiserver-d956f7fc6-h7gxk which acts an API server for all our storage requests.
The pod epc-openebs-ndm-operator-6f94f484b5-nr7n6 relates operations performed on the block device using the methods in data planes.
The OpenEBS operator will deploy each Snapshot-controller and snapshot-provisioner container inside the single pod called snapshot-controller.
Check if they are scheduled on the appropriate nodes by listing the pods through : kubectl get pods -n epc-openebs -o wide
$ kubectl get pods -n epc-openebs -o wide

AME                                               READY   STATUS    RESTARTS   AGE     IP            NODE        NOMINATED NODE   READINESS GATES
epc-openebs-admission-server-6559b8875f-khs27      1/1     Running   0          37h     10.36.0.7     sauvignon   <none>           <none>
epc-openebs-apiserver-d956f7fc6-h7gxk              1/1     Running   0          5d18h   10.36.0.2     sauvignon   <none>           <none>
epc-openebs-localpv-provisioner-5594c6f4c9-tbzxw   1/1     Running   0          37h     10.36.0.8     sauvignon   <none>           <none>
epc-openebs-ndm-d6t68                              1/1     Running   4          38h     10.6.29.167   cabernet    <none>           <none>
epc-openebs-ndm-k2l72                              1/1     Running   0          5d18h   10.6.29.166   sauvignon   <none>           <none>
epc-openebs-ndm-operator-6f94f484b5-nr7n6          1/1     Running   0          37h     10.36.0.6     sauvignon   <none>           <none>
epc-openebs-provisioner-58449b68bc-5cjzd           1/1     Running   0          5d18h   10.36.0.4     sauvignon   <none>           <none>
epc-openebs-snapshot-operator-74b8449d5c-m7lz7     2/2     Running   0          5d18h   10.36.0.3     sauvignon   <none>           <none>
$
Verify Block Device CRs
NDM daemon set creates a block device CR for each block devices that is discovered on the node with two exceptions
The disks that match the exclusions in ‘vendor-filter’ and ‘path-filter’ The disks that are already mounted in the node
List the block device CRs to verify the CRs are appearing as expected.
$ kubectl get blockdevice -o wide -n epc-openebs


blockdevice-04163142059ad8e21179236d5a95f980   sauvignon   /dev/dm-13                  118111600640    Unclaimed    Inactive   17h
blockdevice-21a449a3d6e91c0f752e1d3c9189de83   sauvignon   /dev/dm-10                  118111600640    Unclaimed    Inactive   17h
blockdevice-2974f76cb82eb4f52122ca35a80df6df   sauvignon   /dev/dm-9                   118111600640    Unclaimed    Inactive   18h
blockdevice-60816734326c5570b533375d7a64043b   cabernet    /dev/dm-13                  118111600640    Unclaimed    Inactive   9h
blockdevice-60d68e1c853610c9e9c0cf3f52ae567a   sauvignon   /dev/dm-7                   1200210141184   Unclaimed    Inactive   5d22h
blockdevice-7c6542453aa8c16f488f9458beb10353   cabernet    /dev/dm-10                  118111600640    Unclaimed    Active     18h
blockdevice-7f7637671786f26253e8b634844eea42   sauvignon   /dev/dm-4                   2280392753152   Unclaimed    Inactive   5d22h
blockdevice-979d5f100a1e5a97488036a1a7920662   cabernet    /dev/dm-12                  118111600640    Unclaimed    Inactive   9h
blockdevice-c9f10ae32f939a70e686b4e53fda2ad8   sauvignon   /dev/dm-8                   240021504000    Unclaimed    Inactive   5d22h
blockdevice-caf55be6298940aada433108257b9074   cabernet    /dev/dm-5                   2280392753152   Unclaimed    Inactive   5d22h
$
In our configuration we have 3 disks of 110 GB available on each workers nodes :
Node cabernet
$ multipath -ll

mpathdg (2dba169173d66373f6c9ce9004fa55341) dm-13 HP  ,LOGICAL VOLUME
size=110G features='1 queue_if_no_path' hwhandler='1 alua' wp=rw
`-+- policy='service-time 0' prio=0 status=active
  |- 3:0:0:2 sdi 8:128 active undef running
  `- 4:0:0:2 sdk 8:160 active undef running
mpathdf (2ac2360dcba2ddaed6c9ce9004fa55341) dm-12 HP  ,LOGICAL VOLUME
size=110G features='1 queue_if_no_path' hwhandler='1 alua' wp=rw
`-+- policy='service-time 0' prio=0 status=active
  |- 3:0:0:1 sdh 8:112 active undef running
  `- 4:0:0:1 sdj 8:144 active undef running
mpathde (2f0a08e3930eef1db6c9ce9004fa55341) dm-10 HP  ,LOGICAL VOLUME
size=110G features='1 queue_if_no_path' hwhandler='1 alua' wp=rw
`-+- policy='service-time 0' prio=0 status=active
  |- 4:0:0:0 sdf 8:80  active undef running
  `- 3:0:0:0 sdg 8:96  active undef running
  $
Node sauvignon
  $ multipath -ll

  mpathbz (21fb5968af62155cd6c9ce9004fa55341) dm-9 HP  ,LOGICAL VOLUME
  size=110G features='1 queue_if_no_path' hwhandler='1 alua' wp=rw
  `-+- policy='service-time 0' prio=0 status=enabled
    |- 6:0:0:0  sde  8:64   failed undef running
    `- 9:0:0:0  sdad 65:208 active undef running
  mpathcc (27d005fd35b393f056c9ce9004fa55341) dm-13 HP  ,LOGICAL VOLUME
  size=110G features='1 queue_if_no_path' hwhandler='1 alua' wp=rw
  `-+- policy='service-time 0' prio=0 status=active
    |- 6:0:0:40 sdan 66:112 active undef running
    `- 9:0:0:40 sdaq 66:160 active undef running
  mpathcb (24efa1d589f05a06d6c9ce9004fa55341) dm-10 HP  ,LOGICAL VOLUME
  size=110G features='1 queue_if_no_path' hwhandler='1 alua' wp=rw
  `-+- policy='service-time 0' prio=0 status=active
    |- 6:0:0:20 sdaj 66:48  active undef running
    `- 9:0:0:20 sdam 66:96  active undef running

    $
To know which block device CR belongs to which node, check the node label set on the CR by doing the following command :
$kubectl describe blockdevice blockdevice-60816734326c5570b533375d7a64043b -n epc-openebs

Name:         blockdevice-60816734326c5570b533375d7a64043b
Namespace:    epc-openebs
Labels:       kubernetes.io/hostname=cabernet1
              ndm.io/blockdevice-type=blockdevice
              ndm.io/managed=true
Annotations:  internal.openebs.io/uuid-scheme: gpt
API Version:  openebs.io/v1alpha1
Kind:         BlockDevice
Metadata:
  Creation Timestamp:  2021-04-28T06:15:35Z
  Generation:          45330
  Managed Fields:
    API Version:  openebs.io/v1alpha1
    Fields Type:  FieldsV1
    fieldsV1:
      f:metadata:
        f:annotations:
          .:
          f:internal.openebs.io/uuid-scheme:
        f:labels:
          .:
          f:kubernetes.io/hostname:
          f:ndm.io/blockdevice-type:
          f:ndm.io/managed:
      f:spec:
        .:
        f:capacity:
          .:
          f:logicalSectorSize:
          f:physicalSectorSize:
          f:storage:
        f:details:
          .:
          f:compliance:
          f:deviceType:
          f:driveType:
          f:firmwareRevision:
          f:hardwareSectorSize:
          f:logicalBlockSize:
          f:model:
          f:physicalBlockSize:
          f:serial:
          f:vendor:
        f:devlinks:
        f:filesystem:
        f:nodeAttributes:
          .:
          f:nodeName:
        f:partitioned:
        f:path:
      f:status:
        .:
        f:claimState:
        f:state:
    Manager:         ndm
    Operation:       Update
    Time:            2021-04-28T06:15:35Z
  Resource Version:  7089388
  UID:               8c9e1d82-de6b-4199-9474-0326ac1ff571
Spec:
  Capacity:
    Logical Sector Size:   512
    Physical Sector Size:  512
    Storage:               118111600640
  Details:
    Compliance:
    Device Type:           mpath
    Drive Type:            SSD
    Firmware Revision:
    Hardware Sector Size:  512
    Logical Block Size:    512
    Model:
    Physical Block Size:   512
    Serial:
    Vendor:
  Devlinks:
    Kind:  by-id
    Links:
      /dev/disk/by-id/dm-uuid-mpath-2dba169173d66373f6c9ce9004fa55341
      /dev/disk/by-id/dm-name-mpathdg
  Filesystem:
  Node Attributes:
    Node Name:  cabernet1
  Partitioned:  No
  Path:         /dev/dm-13
Status:
  Claim State:  Unclaimed
  State:        Inactive
Events:         <none>
$
Now we can create cStor Storage Pools. The cStorStoragePool can be created by specifying the blockDeviceList.
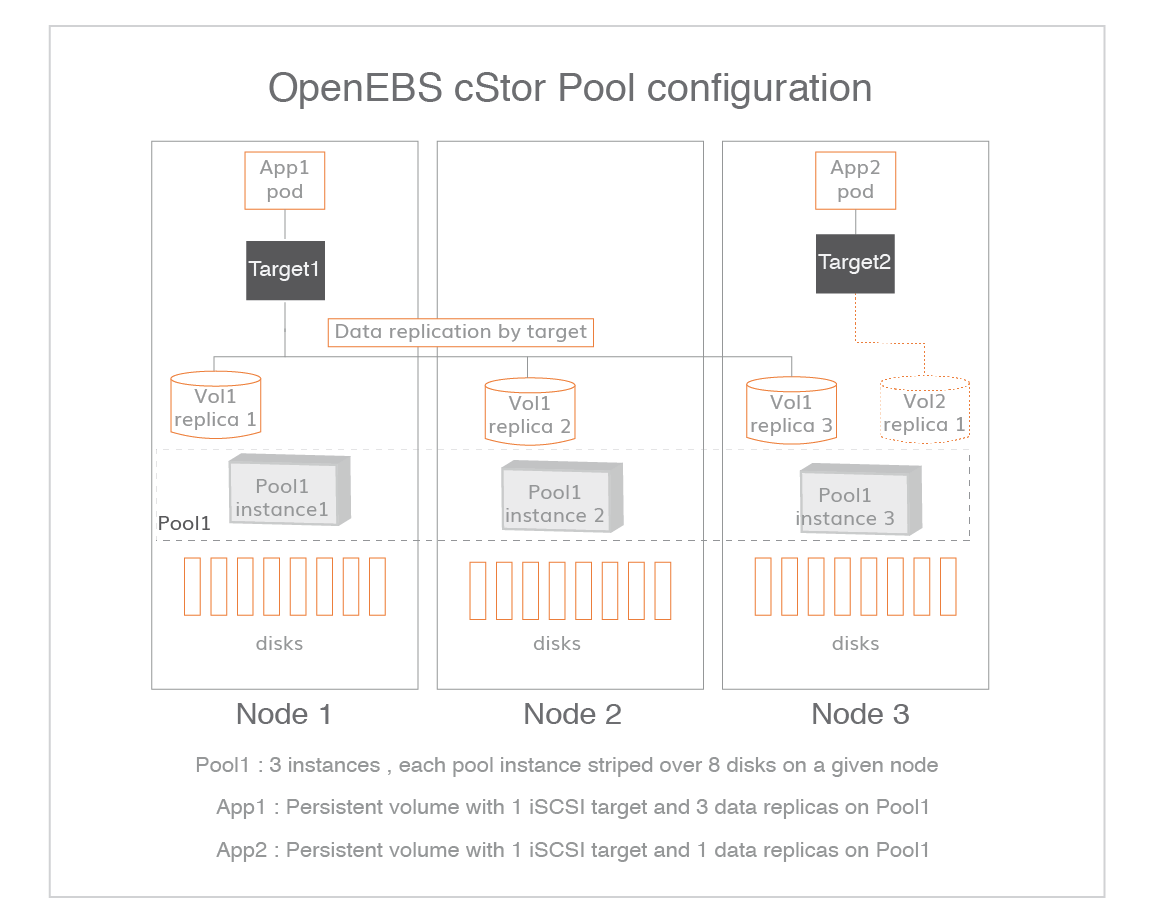
Create a StoragePoolClaim configuration YAML and update the required details.
Create a StoragePoolClaim configuration YAML file called cstor-pool1-config.yaml with the following content. The resources will be shared for all the volume replicas that reside on a pool. The value of these resources can be 2Gi to 4Gi per pool on a given node for better performance. These values can be changed as per the Node configuration for better performance. Refer setting pool policies for more details on the pool policies applicable for cStor.
#Use the following YAMLs to create a cStor Storage Pool.
apiVersion: openebs.io/v1alpha1
kind: StoragePoolClaim
metadata:
  name: cstor-disk-pool
  annotations:
    cas.openebs.io/config: |
      - name: PoolResourceRequests
        value: |-
            memory: 2Gi
      - name: PoolResourceLimits
        value: |-
            memory: 4Gi
spec:
  name: cstor-disk-pool
  type: disk
  poolSpec:
    poolType: striped
  blockDevices:
    blockDeviceList:
    - blockdevice-04163142059ad8e21179236d5a95f980
    - blockdevice-21a449a3d6e91c0f752e1d3c9189de83
    - blockdevice-2974f76cb82eb4f52122ca35a80df6df
    - blockdevice-60816734326c5570b533375d7a64043b
    - blockdevice-979d5f100a1e5a97488036a1a7920662
    - blockdevice-7c6542453aa8c16f488f9458beb10353
---
In the above file, change the following parameters as required.
-
poolType
This field represents how the data will be written to the disks on a given pool instance on a node. Supported values are striped, mirrored, raidz and raidz2.
Note: In OpenEBS, the pool instance does not extend beyond a node. The replication happens at volume level but not at the pool level. See volumes and pools relationship in cStor for a deeper understanding.
-
blockDeviceList
Select the list of selected unclaimed blockDevice CRs which are unmounted and does not contain a filesystem in each participating nodes and enter them under blockDeviceList.
To get the list of blockDevice CRs, use kubectl get blockdevice -n epc-openebs.
You must enter all selected blockDevice CRs manually together from the selected nodes.
When the poolType = mirrored , ensure the number of blockDevice CRs selected from each node are an even number. The data is striped across mirrors. For example, if 4x1TB blockDevice are selected on node1, the raw capacity of the pool instance of cstor-disk-pool on node1 is 2TB.
When the poolType = striped, the number of blockDevice CRs from each node can be in any number. The data is striped across each blockDevice. For example, if 4x1TB blockDevices are selected on node1, the raw capacity of the pool instance of cstor-disk-pool on that node1 is 4TB.
When the poolType = raidz, ensure that the number of blockDevice CRs selected from each node are like 3,5,7 etc. The data is written with single parity. For example, if 3x1TB blockDevice are selected on node1, the raw capacity of the pool instance of cstor-disk-pool on node1 is 2TB. 1 disk will be used as a parity disk.
When the poolType = raidz2, ensure that the number of blockDevice CRs selected from each node are like 6,8,10 etc. The data is written with dual parity. For example, if 6x1TB blockDevice are selected on node1, the raw capacity of the pool instance of cstor-disk-pool on node1 is 4TB. 2 disks will be used for parity.
The number of selected blockDevice CRs across nodes need not be the same. Unclaimed blockDevice CRs which are unmounted on nodes and does not contain any filesystem can be added to the pool spec dynamically as the used capacity gets filled up.
-
type
This value can be either sparse or disk. If you are creating a sparse pool using the sparse disk based blockDevice which are created as part of applying openebs operator YAML, then choose type as sparse. For other blockDevices, choose type as disk.
Now execute the above yaml file using the below-mentioned command
$ kubectl apply -f cstor-pool1-config.yaml

  NAME              AGE
  cstor-disk-pool   26s
$
Verify if cStor Pool is created successfully using the following command.
$ kubectl get csp

NAME                   ALLOCATED   FREE   CAPACITY   STATUS    READONLY   TYPE      AGE
cstor-disk-pool-gcx0   3.59M       327G   327G       Healthy   false      striped   79m
cstor-disk-pool-t6ps   1.83M       109G   109G       Healthy   false      striped   79m
$
Verify if cStor pool pods are running using the following command.
$ kubectl get pod -n epc-openebs | grep cstor-disk-pool

cstor-disk-pool-gcx0-64857c9b4c-5cl4f              3/3     Running   0          80m
cstor-disk-pool-t6ps-7df69c9977-mjr6c              3/3     Running   0          80m
$
Create a StorageClasses:
StorageClass definition is an important task in the planning and execution of OpenEBS storage.
You can create a new StorageClass YAML called openebs-sc-student1.yaml and add content to it from below. By using this spec, a StorageClass (openebs-sc-student1) will be created with 2 OpenEBS cStor replicas and will configure them on the pools associated with the StoragePoolClaim:cstor-disk-pool. Refer setting storage policies for more details on Storage Policies.
apiVersion: storage.k8s.io/v1
kind: StorageClass
metadata:
  name: openebs-sc-student1
  annotations:
    openebs.io/cas-type: cstor
    cas.openebs.io/config: |
      - name: StoragePoolClaim
        value: "cstor-disk-pool"
      - name: ReplicaCount
        value: "2"
      - name: FSType
        value: ext4
provisioner: openebs.io/provisioner-iscsi
reclaimPolicy: Delete
volumeBindingMode: Immediate
Now execute the above yaml file using the below-mentioned command
kubectl create -f openebs-sc-student1.yaml
storageclass.storage.k8s.io/openebs-sc-student1 created
$
Verify if storageclass : openebs-sc-student1 is created successfully using the following command.
$ kubectl get sc|grep student1

NAME                 PROVISIONER                   RECLAIMPOLICY   VOLUMEBINDINGMODE      ALLOWVOLUMEEXPANSION   AGE
openebs-sc-student1  openebs.io/provisioner-iscsi  Delete          Immediate              false                  4m35s
$
Deployment of a database instance
We will use our Terraform Microsoft SQL Server 2019 Linux deployment plan described in the following post : Deploying Microsoft SQL Server 2019 Linux to an Kubernetes Cluster using Terraform To deploy Microsoft SQL Server on our OpenEBS storage. We will provision a Persistent Volume Claim (PVC): pvc-mssqldata01-student1 with our storage class : openebs-sc-student1
Create a MS SQL Server instance:
$ terraform apply \
 -var="name=mssql-deployment-student1" \
 -var="namespace=student1" \
 -var="pvc=pvc-mssqldata01-student1" \
 -var="mssql_pvc_size=50Gi" \
 -var="mssql_storage_class=openebs-sc-student1" \
 -var="mssql_image_url=mcr.microsoft.com/mssql/rhel/server" \
 -var="mssql_image_tag=2019-latest" \
 -var="adminpassword=HPeinvent@"
Check if your SQL Server instance works:
$ kubectl get pods -n student1

NAME                                         READY   STATUS    RESTARTS   AGE
mssql-deployment-student1-677b58bfc9-gzg7r   1/1     Running   0          79s
$
Our PVC is well created if our pods are running …
$ kubectl get pvc -n student1

NAME                       STATUS   VOLUME                                     CAPACITY   ACCESS MODES   STORAGECLASS          AGE
pvc-mssqldata01-student1   Bound    pvc-2019924f-5461-4853-9d0e-d3ea272c8147   50Gi       RWO            openebs-sc-student1   5m30s
$
Perform the following command to get the details of the replicas of corresponding cStor volume:
$ kubectl get cvr -n epc-openebs -l openebs.io/persistent-volume=pvc-2019924f-5461-4853-9d0e-d3ea272c8147
NAME                                                            USED    ALLOCATED   STATUS    AGE
pvc-2019924f-5461-4853-9d0e-d3ea272c8147-cstor-disk-pool-gcx0   94.5M   17.2M       Healthy   14m
pvc-2019924f-5461-4853-9d0e-d3ea272c8147-cstor-disk-pool-t6ps   94.4M   17.2M       Healthy   14m
$
Check connexion to Microsoft SQL Server instance
To access the SQL Server Instance you’ll need to find its port map :
$ kubectl get svc -n student1

NAME                                TYPE       CLUSTER-IP       EXTERNAL-IP   PORT(S)          AGE
mssql-deployment-student1-service   NodePort   10.101.67.163   <none>        1433:30561/TCP   5h55m
$
In our deployment for the service we used the NodePort directive and port 1433 is mapped externally to port 30561. We can access our instance by specifying the name (or ip address) of one of the cluster nodes and port 30561.
You can connect to the SQL Server instance outside the Kubernetes cluster with command line :
$ sqlcmd -U sa -P HPeinvent@ -S 10.6.29.166,30561 -q "select @@version"

  Microsoft SQL Server 2019 (RTM-CU10) (KB5001090) - 15.0.4123.1 (X64)
    Sat 10 2021 18:10:24
    Copyright (C) 2019 Microsoft Corporation
    Developer Edition (64-bit) on Linux (Red Hat Enterprise Linux 8.3 (Ootpa)) <X64>

(1 rows affected)
$
we will now restore a database :
- STEP 1: Get POD Name :
$ export POD_NAME=`kubectl get pods -n student1|grep mssql-deployment-student1|awk '{print$1}'`- STEP 2: create a backup folder :
$ kubectl -n student1 exec -it $POD_NAME -- mkdir /var/opt/mssql/backup- STEP 3: Copy data backup files :
$ kubectl -n student1 cp /home/mssql/db/WideWorldImporters-Full.bak $POD_NAME:/var/opt/mssql/backup
$
$ kubectl -n student1 cp /home/mssql/db/restorewide.sql $POD_NAME:/var/opt/mssql/backup
Check if files are copied.we must have 2 files: restorewide.sql and WideWorldImporters-Full.bak
$ kubectl -n student1 exec -it $POD_NAME -- ls /var/opt/mssql/backup
$ WideWorldImporters-Full.bak restorewide.sql- STEP 4: Now now we can restore our Database
sqlcmd -U sa -P HPeinvent@ -S 10.6.29.166,30561 -i restoredb.sql
Database 'WideWorldImporters' running
100 percent processed.
RESTORE DATABASE successfully processed 58455 pages in 47.332 seconds (9.648 MB/sec).
After a few seconds the database is restored
- STEP 5: Verify the restored database
sqlcmd -U sa -P HPeinvent@ -S 10.6.29.166,30561 -Q "SELECT TOP 10 StockItemID, StockItemName FROM WideWorldImporters.Warehouse.StockItems ORDER BY StockItemID"Perform the following command to get the details of the replicas of corresponding cStor volume: we can notice that the space used has increased and that it is synchronous on the second replica (due to the restoration of the database).
$ kubectl get cvr -n epc-openebs -l openebs.io/persistent-volume=pvc-2019924f-5461-4853-9d0e-d3ea272c8147
NAME                                                            USED    ALLOCATED   STATUS    AGE
pvc-2019924f-5461-4853-9d0e-d3ea272c8147-cstor-disk-pool-gcx0   814M   384M        Healthy   6h54m
pvc-2019924f-5461-4853-9d0e-d3ea272c8147-cstor-disk-pool-t6ps   814M   384M        Healthy   6h54m

$
Conclusion
Terraform makes it easy to manage Kubernetes clusters and Kubernetes resources effectively. It gives organizations the opportunity to work with infrastructure-as-code, management of platforms, and also the opportunity to create modules for self-service infrastructure. Terraform Kubernetes provider gives organizations all the required tools necessary to manage Kubernetes clusters in the environment.
OpenEBS extends the benefits of software-defined storage to cloud native through the container attached storage approach. It represents a modern, contemporary way of dealing with storage in the context of microservices and cloud native applications.
Next step
Using Volume Snapshot and Clone of a cStor Volume in OpenEBS
Resources :
The OpenEBS Documentation
 OpenEBS Helm Chart Documentation
 The Terraform Documentation